Introduction
LoopToGo is fast, intuitive live-looping software built for scripted (or programmed) performances. It’s not a DAW — it’s a looper!
There are three versions of LoopToGo: Free, Advanced, and Pro. The Free version is limited to 4 tracks, the Advanced version increases the limit to 8 tracks, and the Pro version offers unlimited tracks. All editions use the same software — you simply unlock the version you need with a purchased license key. We recommend starting with the Free version before upgrading to one of the paid editions.
Requirements
- Windows 10 or Windows 11 – 64 bits
- SSD drive is recommended for your VST3 plugins and song files
- Intel i3 3 GHz or better
- Minimum 8 GB of RAM (16 GB or more is recommended)
Installation
There are two ways to install LoopToGo: an installation package (.exe extension) or a ZIP file (.zip extension). You only need to download one or the other.
EXE file
To install: double-click on the exe file and select a folder to install LoopToGo.
To uninstall: use Uninstall LoopToGo from the Windows Search field.
Note: to install an older version on the same folder, you have to delete the file LoopToGo.exe.
or
ZIP file
To install: Extract the zip file with the tool of your choice then copy all the files, folders and subfolders to a folder (example: c:/LoopToGo) on a local disk (SSD is recommended).
To uninstall: simply delete all files.
We suggest that you create a desktop shortcut pointing to LoopToGo.exe. You have to make sure that the software runs in the folder where you put LoopToGo.exe
Getting Started
When first launching LoopToGo, a Welcome and Tutorials dialog window will appear to help the user set up LoopToGo. Following the proposed steps should be straightforward. Alternatively, the following instructions can be used. Note that if the Welcome and Tutorials dialog does not appear automatically, it can be opened manually via the ? menu.
Double click on LoopToGo.exe (or on the desktop shortcut you created) to launch it. At first launch, you will be asked to scan all your VST3 plugins in the standard folder (c:/program files/common files/VST3). We suggest you do so. This process may take a while if you have many plugins installed.
The first time you run LoopToGo, you must configure the MIDI devices, the audio interface and the VST3 folders. You do so in the Preferences dialog (Files->Preferences…)

VST3 Plugins
If all your VST3 plugins are installed in the default directory and you scanned it at first launch, you can skip this step. In this tab of the Preferences dialog, you can specify where your VST3 plugins are installed. You can have many folders and there is no need to list the subfolders. Then you have to hit the Scan Plugins button or the Scan new Plugins only buttons. The VST3 plugins will now be available on the plugins browser of the main window. Note that you can edit the category of a plugin in the Category column. When a category has been changed, it is shown in an orange font. If you want to go back to the default value, simply erase the category.
Audio devices
Important: you have to select one ASIO driver for LoopToGo to work. Also, it is recommended to use name mapping for your audio channels. By doing so, you can change your hardware configuration without having to change all your song settings. Note that it is possible to assign more than one mapping to the same Input or Output channel. This offers a lot of flexibility to perform the same songs with different hardware setups. Furthermore, it is possible to create Virtual Output channels. To change the mapping name, click on the cell under the Mapped Name column. Use the « Add Input Mapping » or « Add Output Mapping » to add new mappings. Select « Virtual Output » to create a virtual mapping. Virtual Outputs can be used to add flexibility to your audio routing configuration. Virtual Outputs signals are not sent to your audio interface hence, a real Output channel eventually needs to tap into a Virtual Output to produce sound. See the « Audio Tab » section for more details about Audio I/O mapping. See this link for a more detailed explanation of routing in LoopToGo.
For live performance, a smaller buffer is needed to avoid latency problems. 512 is usually the maximum recommended but 256 and less are better (this depends on your computer performance since a small buffer assures low latency but might lead to audio glitches as you use more and more plugins). This configuration has to be done via the driver control panel. To access it, you can use the Show driver control panel button. Note that some drivers do not offer this functionality so you have to open their control panel outside of LoopToGo. After changing a setting in the driver control panel, you have to restart the driver with the Restart ASIO driver button. This is mandatory to make sure that LoopToGo knows the buffer length and the sample rate. Not doing it will result in unexpected results!

MIDI devices
LoopToGo automatically recognizes all your MIDI devices. This could be sufficient to use them later but it is highly recommended that you use name mapping in order to filter MIDI channels and to avoid problems when using different hardware configuration (home studio vs live gig with different keyboards for example). Furthermore, you can assign more than one mapping to a device with different MIDI channel (right-click on a mapping name to add other mappings). It is useful when using pads, control, pedals, etc. See this link for a more detailed explanation of routing in LoopToGo.
You can also reassign a MIDI channel to any Input (4th column: « Change to »). This is useful for a plugin that provides many instruments with different MIDI channels (e.g., Kontakt player).
It is also possible to create Virtual MIDI devices by right-clicking on any device. Refer to the MIDI Mapping section for more details.
It is possible to disable specific devices using the second tab (MIDI Enabling). See Preferences section for more details.
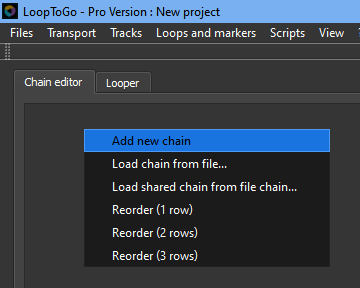
Fx chains and tracks
In LoopToGo fx chains and tracks are linked (i.e. to create a track, you create an Fx chain). To create an Fx chain, right-click anywhere in the Chain Editor tab and select Add new chain. You can also drag a plugin from the plugin browser (top right section of the main window), drag a previously saved chain from the chain browser (middle right section of the main window) or drag a whole song from the song browser (bottom right section of the main window). This creates a new chain. Then, you can rename the chain and select one or two audio inputs (or MIDI ) and one or more audio outputs.
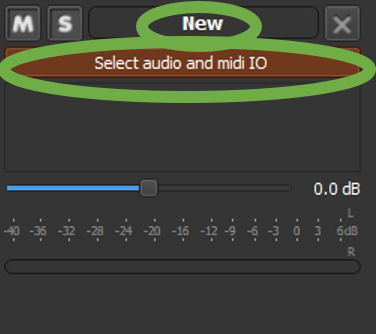
Please note that a chain always requires the selection of certain Inputs and/or Outputs to be processed. The specific Inputs or Outputs needed depend on the type of chain being used. For instance, a standard chain necessitates the selection of at least one audio output to be processed.
If the ‘Select audio and MIDI IO’ buttons are red, it indicates that some I/O settings are missing, and the chain cannot be processed. Additionally, LoopToGo automatically determines whether a track is for audio, MIDI instrument, or automation (or a combination thereof), eliminating the need for user specification.
Scripted looping
Scripted looping, also known as ‘pedal-free looping’ or ‘programmed looping,’ involves pre-determining when an instrument or voice will be recorded and played back. In contrast to traditional looping with a pedal, this method allows musicians to focus solely on playing music, without needing to manually trigger looping actions. Note that the « scripted looping » concept is not directly related to the scripting language capabilities of LoopToGo. One does not need to learn the LoopToGo scripting language to achieve scripted looping.
While scripted looping may initially seem less flexible, LoopToGo offers numerous features to incorporate improvised sections into your music. Explore options such as Jam mode and Free Tempo mode to add spontaneity and creativity to your compositions.
Scripted looping is very intuitive in LoopToGo. In the Looper tab, simply use an Orange (reddish) rectangle to record a loop (Shortcut R) and a Green rectangle to play the loop (Shortcut P). Use the Transport buttons to rewind, rewind to last selection, play or record. To pause, click on again on play or record when the song is playing or recording. Click on the metronome logo to change the song signature. There is a native metronome in LoopToGo with simple features (click on the metronome logo to configure – see « Signature, Tempo and Metronome settings » section for more details). For more versatility, you can also use a metronome plugin (ex MMetronome is a very good free metronome from MeldaProduction) or a MIDI sequencer with a drum instrument (Ex: Stochas + Monster Drum for free solutions).
Jam mode (or Standard looping)
Jam mode is used to repeat a loop (or many selected loops) until the user chooses to go out of Jam Mode. This mode can be used in a scripted song to repeatedly jam over a part of the song. It can also be used to replicate a standard multi track looper. Note that all shortcuts related to Jam mode can be « MIDI learned » to associate them to pedal switches or MIDI controller buttons.
Enabling Jam Mode
To enable Jam mode, you have to be recording and have a track selected (a track can be selected either by clicking on its name or using the up and down keys on the looper view). There is also a way to enable the Jam mode via a marker (see shortcuts below). While recording, when the Song Tick is inside a record loop, hit the J key to enable the Jam mode in record state. Hit J again to cycle between the different states: (Overdub, Lock, Record). Note that the change of state will occur at the end of the loop. The name of the next state will be flashing if different than the current state. Note that you can include a fourth state (Resume) by enabling it in Preferences/General/Markers. To get out of the Jam mode, press « O ».
- Record State (Orange): loop will be cleared at the beginning and audio and/or MIDI events will be recorded
- Overdub State (Yellow): loop will not be cleared at the beginning and audio and/or MIDI events will be recorded over existing data
- Lock State (Gray): no more audio and/or MIDI events will be recorded (loop will keep current data). The loop will be locked until the song is stopped or if Jam mode is enabled again for this loop.
- Resume (Gray, optional): Jam mode will turn off at the end of the loop. All loops that were in jam mode will be locked until the song is stopped or if Jam mode is enabled again for this loop.
Shortcuts for Jam Mode
Here is the list of shortcuts related to Jam mode:
- J: Enable Jam mode and cycle through the different states (see above for more details)
- CTRL-J: Add/remove a Jam marker at the beginning of the under mouse loop. If there is no loop under the mouse, the marker will be added to (or removed from) the selected loop if only one loop is selected. When recording, the Marker will enable the jam mode for the loop when the song tick cross the marker position. Note that a Jam marker can also be added manually by clicking on the very top of the looper view (above the bar scale).
- E: Erase all audio and MIDI data for the Jam mode loop (or selected loop)
- O: Get out of the Jam mode.
- Other Jam shortcuts with no default assignment. You must either assign a keyboard shortcut or a MIDI event (recommended). These shortcuts are designed to be used with pads or MIDI pedals.
- Arm Record for Track X: Record loop on track X will go into Record mode at the end of the loop
- Arm Overdub for Track X: Record loop on track X will go into Overdub mode at the end of the loop
- Record on Track X: Record loop on track X will immediately go into Record mode
- Overdub on Track X: Record loop on track X will immediately go into Overdub mode
- Lock Track X: Record loop on track X will immediately be locked
Free Tempo Mode
The Free Tempo Mode allows the user to perform a song without any pre-set tempo. The tempo of the song is computed from the first Record loop. When this mode is enabled (via the Signature, Tempo and Metronome settings dialog), pressing the Record trigger will behave as follows:
- First Record press: the song is prepared and armed (new behavior since release 3.1.2). The Song Tick must be at the beginning of the First Record Loop (or earlier) before pressing Record for the first time. Otherwise, LoopToGo will behave as if Free Tempo Mode were not enabled.
- Second Record press: the Song Tick is placed at the start of the First Record Loop, and recording begins.
- Third Record press: the Song Tick is set at the end of the First Record Loop, and the tempo for the rest of the song is computed.
Free Tempo Mode works with both audio and MIDI loops.
Choosing the First Record Loop
The First Record Loop is selected according to the following priority:
- The Record loop that starts first (if there is only one).
- If multiple Record loops start at the same time but have different lengths: the shortest one.
- If multiple Record loops start at the same time and have the same length: the one on the highest track in the looper view.
Only one loop is tagged as the “Free Tempo loop,” but the others will also record audio or MIDI events.
Free Tempo Lower Limit
In the Signature, Tempo and Metronome settings dialog, you can set the Tempo lower limit for Free Tempo Mode. If the song is recorded below this limit, it will automatically advance to the next loop because the loop buffer will be full. To avoid this, choose a lower value for this parameter. The trade-off is that selecting a very low “Tempo lower limit” requires more internal memory.
Files
- New…: Close current song if any and start a new song. If the current song has not been saved, the user will be asked to save, create a new song without saving or cancel (return to current song). Default Shortcut is CTRL-N
- Open…: Open a previously saved song. If the current song has not been saved, the user will be asked to save, create a new song without saving or cancel (return to current song). Default Shortcut is CTRL-O. A very efficient way to achieve the same result is to drag and drop the Song from the Song browser. Important: If there are some Plugins used by the song that are not found, a warning message will be shown and the missing plugins will be shown in red in the Chain Editor view and the Console. A list of the missing plugins will be shown in the Error/Log console. The Song name will be reset to « New Project » and you will be asked to save under a different name when saving this song. Note that all the missing plugin configurations will be lost in the new saved song.
- Add…: Add a previously saved song to the current song. All the new tracks will be added after the current tracks.
- Open recent >: Show a menu of recent open or saved files to open.
- Save: Save the current song. If the song has never been saved, the user will be asked a name for the song. The songs are saved in the default folder {user}/Documents/LoopToGo/Songs or in {DocumentRegistryDefined}/LoopToGo/Songs*. It is possible to create sub-folders in the Songs folder to keep the song. If a song has been modified, two asterisks (**) will be shown after the song’s name at the top left of the window. If the song has been auto-saved only one asterisk (*) will appear. When a song is saved, no asterisks are shown. You can change the frequency of the auto-save in Preferences/General.
- Save as…: Save the current song under a new name.
- Export
- Export Song…: Open the Export Song Dialog. This Tool is used to export a song (or part of a song) to an audio wav file. See the Export Song section for more details
- Export all tracks (raw data): Export an audio (.wav) file and a MIDI (.mid) file for each track. The files will be saved in the Export folder of the Song Folder. A message will give the exact folder path. The audio files are in raw data, meaning that no Plugin effects are applied but the reverse mode and playback speed are applied if any. The MIDI files take into account the transpose, reverse and the playback speed parameters but not the quantization and humanization. See next menu item. All the old files are over-written if any.
- Export all MIDI tracks (quantized and humanized): Save a MIDI file for each track. The MIDI files take into account the transpose, reverse, the playback speed , the quantization and humanization parameters. All the old MIDI files will be over-written including those saved with the previous menu item.
- Load Persistent chains…: Load a set of chains as persistent chains. See the Persistent Chain Editor section for more details.
- Save Persistent chains…: Save the current persistent chains.
- Preferences…: Open the Preferences dialog. See Preferences dialog section below, for details.
- Activate Pro version…: Open the dialog to activate the Pro version. The email used to buy the Pro version License and the license will be required.
*It is possible to change the default LoopToGo folder by creating the following registry entry: UserPath in Computer\HKEY_CURRENT_USER\SOFTWARE\LoopToGo. Note that you must be very careful when editing Windows Registry. Modifying the registry improperly can result in Windows or other applications becoming corrupted! When the UserPath value is created, LoopToGo will use it for all its configuration files (MyConf.xml, etc.) and all its sub-folder (Songs, FxChains, Scripts, etc.). Your Windows account needs to have Administrator permissions to use this functionality. If not, you must start LoopToGo « as Administrator ».
Transport
- Play
- Record
- Stop
- Set song info…
- Toggle Play
Tracks
- Add new track/chain
- Load chain from file…
- Load chain from song…
- Lock all loops
- Unlock all loops
- Reset all meter max values
- Clear all loops data (locked loops will not be cleared)…
- Load Snapshot (audio and MIDI data)…
- Save Snapshot (audio and MIDI data)
- Save Snapshot (audio and MIDI data)…
- Save « Best take » (audio and MIDI data)
Loops and Markers
- Rename selected loop…
- Merge selected loops…
- Add marker…
- Delete selected loops and markers
- Edit selected marker properties…
- Load Snapshot for selected loops…
- Load « Best Take » Snapshot for selected loops…
- Save « Best take » Snapshot for selected loops
Scripts
- Link Script to MIDI or Keyboard event…
- Add a script button…
- Reload all scripts (MIDI triggered, Markers and Loop Scripts)
- Manage scripts…
Interfaces
- Show Interfaces Browser…
View
- Lyrics and chords: When checked, the Lyrics and chords are displayed on the Looper view. To add Lyrics and chords to a song, use the Lyrics and Chords Editor
- Plugins, Chains, Songs and Playlists browser: When checked the Plugins, Chains, Songs and Playlists browser is visible
- Song`s structure: When checked, the Song’s Structure is visible
- Mixing Console: When checked, the Mixing console is visible
- Persistent Chain Editor: When checked, the Persistent Chain Editor Tab is visible
- Script Buttons: When checked, the Script Buttons section is visible
- Show Lyrics and chords Editor: Opens the Lyrics and Chords Editor
- Show MIDI console…: Opens the MIDI Console.
- Show Script Buttons Window: Opens the Script Buttons Window
- Show Error/Log console…: Opens the Error/Log Console
- Show Plugin CPU Usage console…: Opens the Plugin CPU Usage console.
- Show Live Audio Recorder…: Opens the Live Audio Recorder Dialog. See the Live Audio Recorder Dialog section for more details
?
- About…
- Help…
- Check for new version…
Main window – Chain Editor
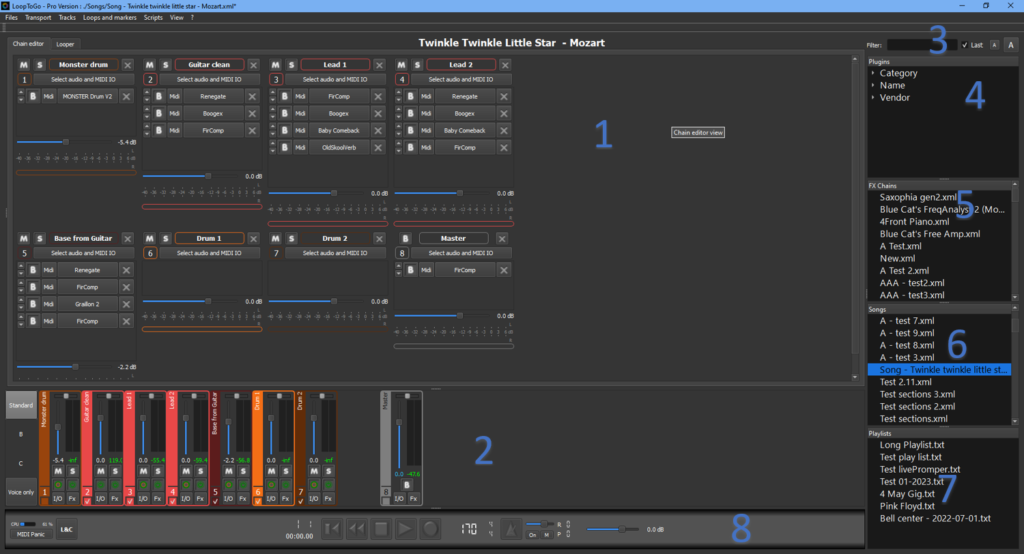
- Section 1: Chain Editor area. This is where you create and edit the chains/tracks for your project. To add a chain, right-click anywhere on this area or drag and drop plugins or chains from the Plugin tree view (Section 4) or the Chain tree view (Section 5)
- Section 2: Console area.
- At the far left: 4 preset buttons allow users to store and recall chain presets (Volume, Solo, Mute, etc.). To store a preset, right-click on one of the 4 buttons. To recall a preset, click on the corresponding button. By right-clicking, it is also possible to rename the button label or delete a preset. The preset programming is saved with the song.
- The chains are shown at the right of the preset buttons with smaller widgets than those displayed in the Chain Editor area. Note that the Input Buses are displayed at the left, while the Output Buses and Master Buses are always on the right after a space. Ctrl-H toggles the area.
- Section 3:
- Filter string for all tree views (Section 4, 5 and 6). CTRL-B toggles Sections 3, 4, 5 and 6.
- « Last » checkbox: When checked, this option will display the Chains, Songs, and Playlists based on their last modification time, showing the most recently modified items first, instead of alphabetical order.
- Small « A » and big « A » buttons: Decrease or increase the fonts used in the looper view.
- Section 4: Plugin tree view. All the plugins known by LoopToGo are listed in this view. After adding new plugins on your computer, you have to hit the « Scan for new plugins » button in « Files/Preferences/Plugins ».
- Section 5: Chain tree view. All the chains saved on your disk are shown there. To save a chain, right-click on a chain in the Chain Editor area (Section 1) and select « Save chain ». The chain is saved with the name of the chain as the filename. To use an already saved chain simply drag it from the Chain tree view (Section 5) to the Chain Editor area (Section 1). You can also right-click on the Chain Editor area (Section 1) to load a chain.
- Section 6: Song tree view. All the songs/projects saved on your disk are shown there. To save a song, hit CTRL-S or go to « Files/Save… » or « Files/Save as… ». To reload a song simply drag it from the Song tree view (Section 6) to the Chain Editor area (Section 1). You can also use « Files/Open… ».
- Section 7: Playlist view. All the playlists that you have created are shown here. See the « Song playlists » section for more details.
- Section 8: Transport area
- CPU Meter: Displays the CPU usage of the audio engine. The blue bar represents the current CPU usage, while the percentage value on the right side of the meter is the maximum usage value since the last reset. To reset this value, right-click on it or select ‘Tracks/Reset all meter max values.’ You can also reset all meter values by pressing CTRL-R. Additionally, the maximum value is automatically reset when a song is played or recorded from the beginning (bar 1). The maximum value should not exceed 100% while recording a song. Clicking on this section will bring up the Plugin CPU Usage console.
- Chords: shows the chord editor. This is where you can add Chords and Lyrics to a song. See Chords section for more details.
- Midi Panic: clicking on this button stops all pending MIDI notes.
- Bank button: clicking on this button will change the actual bank used for shortcuts (track mute/unmute, track select and track volume). This button is shown only if the number of tracks is higher than the « Number of tracks per bank » defined in Preferences/shortcuts. See Shortcuts section for more details.
- Stop Scripts button: clicking on this button will stop all running scripts except the scripts where the « setScriptStopMode 1 » command has been used. Right-clicking on this button will show all running scripts and allow the user to stop each script individually including the ones that used the command « setScriptStopMode 1 ».
- Standard timing indicator: shows the actual playhead position in standard time format. The format is [minutes]:[seconds].[hundredth of a second]. If the playhead position is above 1 hour, the format will switch to [hour]:[minutes]:[seconds]
- Bar Timing indicator: shows the actual timing of the song in bars and ticks. A tick countdown is also shown before recording or playing a song if this option is enabled in the metronome dialog.
- Transport buttons:
- Rewind to start
- Go to last selected timing position
- Play/pause
- Record/pause
- Note: Here are the differences between the song being stopped or paused:
- Stopped: The « Stopped » monitoring mode selected for each track is used. If Play or Record is triggered while in this mode, the metronome will play according to the parameters selected in the Song Info dialog.
- Paused: The « Play and Record » monitoring mode selected for each track is used. For example, if the song is paused over a Record loop after being in record mode, the corresponding track will be monitored, provided the appropriate monitoring mode is selected for this track.
- Note: Keyboard arrows can be used to go to next start or end of loops. CTRL-LEFT-ARROW goes to beginning of song. CTRL-RIGHT-ARROW goes to end of song.
- Song tempo: to change song tempo, click on the metronome icon.
- Song signature: to change song signature, click on the metronome icon.
- Metronome icon: shows the metronome dialog where you can change the song and metronome parameters.
- Metronome Volume: change the metronome volume of all songs. This parameter is saved with the general parameters. if you want to specify a volume for a specific song you have to use the volume sliders in the Signature, Tempo and Metronome setting Dialog (see below).
- On: turn the metronome always On. Audio output must be specified in the the Signature, Tempo and Metronome setting Dialog (see below)
- M: Mute the metronome
- R: number of metronome pre-record clicks
- P: number of metronome pre-play clicks
- Main volume slider: gain applied to the song. You can right-click on this slider to associate MIDI event to this widget or to reset the value to 0 dB (gain of 1).
- Information Field: display various message or information
Signature, Tempo and Metronome settings
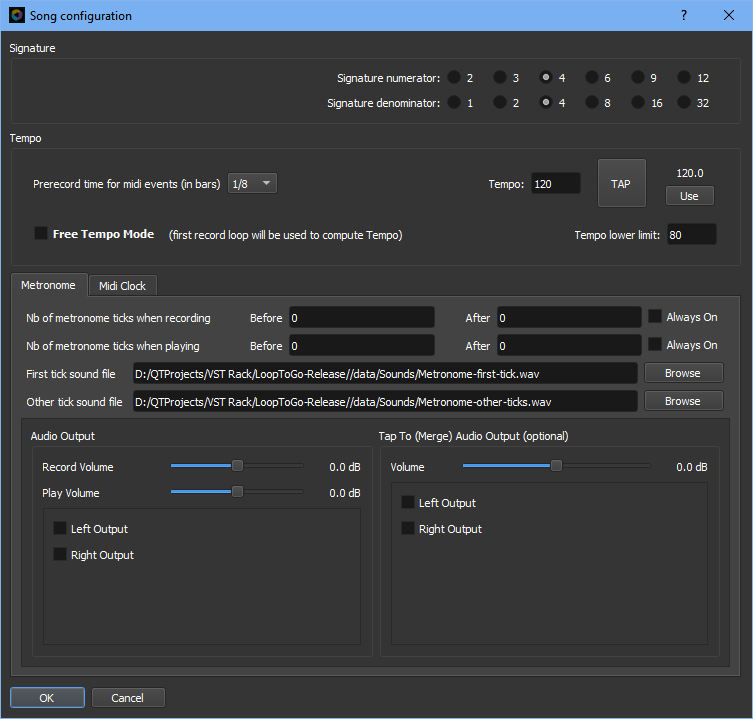
- Signature: use to set the song’s signature.
- Tempo:
- Prerecord time for MIDI events: use to allow LoopToGo to play and record MIDI events that occur just before the start of a Record loop. If a note starts and stops within this range (before the start of the loop), it will play but won’t be recorded in the loop (won’t play afterward in a Play loop). This parameter is also used in Jam mode while overdubbing: notes at the end of the loop within this range will be kept. When the Jam mode resumes, these events will be placed at the beginning of the loop. The recommended value for this parameter depends on your musician skills: a lower value can be used if you are very accurate in your timing. A value of 0 is never recommended.
- Tempo: tempo used in the song in BPM (beats per minute). For now, it is not possible to change the tempo while a song is playing or recording. When changing tempo, the audio recording will keep the same pitch. This is done using the SoundTouch library (Copyright © Olli Parviainen. See SoundTouch website for more details). Though it might result in quality loss, this is very useful for practicing. Note that before changing the tempo, LoopToGo automatically saves a snapshot of the song. If you return to the original tempo, LoopToGo will use this snapshot for loops that have not been re-recorded. This feature limits the quality loss.
- Tap: click many times on this button at a regular interval to manually define a tempo. The tempo will be shown in BPM at the right of the Tap button. The Use button will copy this value to the Tempo value (left) to be used in the song. The default shortcut for the tap button is the = sign on the computer keyboard, but it can be assigned to a MIDI event or another computer shortcut.
- Free tempo mode: Enable or disable the Free Tempo Mode. The tempo will be computed from the first record loop. See « Free Tempo Mode » section for more details.
- Metronome:
- Number of ticks: the number of ticks to be played before and after the start of recording or playing can be set. The metronome can also be set to always tick after recording or playing start.
- First tick and second tick sound files: the sound of the metronome (first tick and other ticks) can be changed by loading a corresponding wave files.
- Record and Play Volumes: volume for the metronome. You can set different volumes for the recording and for the playing. Note that these volumes are specific to a song. If you want to change the volume for all songs in a show, use the metronome volume on the main window.
- Audio Output: you have to select the audio output for the metronome. This can be assigned to different outputs than the ones used for the song if you have enough output channels.
- Volume: volume for the Merged Audio Output (see below)
- Merged Audio Output (optional): If selected, an output will be merged to the Metronome selected output. This is useful for live performance when the musician wants to hear the Metronome and the songs in a headset (or earplugs) while the crowd only hears the song. To work, the Audio interface must have at least 2 outputs (mono mode) or preferably 4 outputs (stereo mode). Note that if you select the same outputs as the Audio Outputs (see previous item), and use these outputs for the song, the song audio level will be doubled. This is not recommended nor necessary!
- Midi Clock: This tab is used to select which MIDI devices will receive a Midi Clock signal. It is useful for synchronizing external MIDI devices with LoopToGo. Check the MIDI device user manual to see if it supports Midi Clock synchronization. The default settings should work for most devices. Note that the Midi Clock configuration is saved with each song.
- Midi Device: name of the MIDI device connected to your computer (non editable field)
- Midi Clock: Click on Active to enable Midi Clock for the corresponding MIDI device. A check will appear beside Active.
- Start not Continue: A start message will be sent when a Continue message should be sent. To use when your MIDI device does not support Continue message but only Start and Stop. Click on « Always start » to enable.
- Song Position Pointer: A SPP signal with the song bar position will be send to the MIDI device when needed if checked (default).
- Send if song is stopped: Send the Midi Clock signal even if the song is stopped (when checked).
Create an FX chain
There are many ways to create a new FX chain in LoopToGo
- Right-Click on the « Chain Editor area » and select « Add new chain ». An empty chain will be created.
- Right-Click on the « Chain Editor area » and select « Load chain(s) from song… » to open a dialog that will allow the user to choose a chain (or many chains) from a previously saved song.
- Right-Click on the « Chain Editor area » and select « Load chain… » to load a previously saved chain.
- Drag a plugin from the « Plugin tree view » to the « Chain Editor area ». A chain including the dragged plugin will be created. You will have to select the input(s) and output(s).
- Drag a previously saved chain from the « Chain tree view » and to the « Chain Editor area ».
- Drag a song from the « Song tree view » to the « Chain Editor area ». All the chains of the song will be loaded.
There are many ways to change the color of a chain/track:
- In the Chain Editor: right-click on a chain, below the last plugin and select « Change track name and color… »
- In the Chain Editor: click on the square just below the Mute button. This square displays the track number if the chain is part of the current track bank.
- In the Console view: click on the name section of a chain
- In the Looper View: right-click on a track name and select « Change track name and color… »
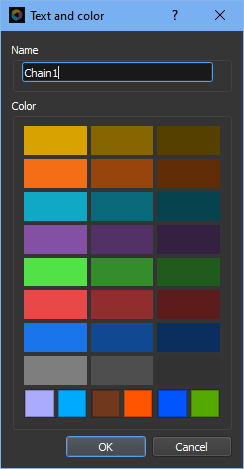
The following dialog will be shown. You can edit the name of the chain and click ok or click on a color. You can choose between the 24 standard colors (rectangles) or the 6 custom colors (small square at the bottom). To set a custom color, simply right-click on one of the 6 small squares at the bottom.
Configure an FX chain
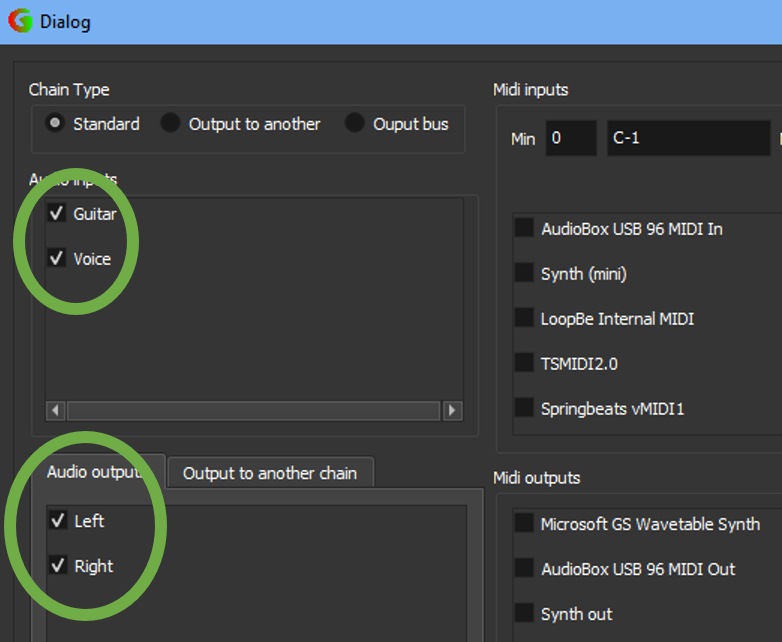
To configure an FX chain press on the « Select audio and MIDI IO » button (Chain Editor) or the I/O button (Console). Note that these buttons will be red when not properly configured. The following dialog will show up.
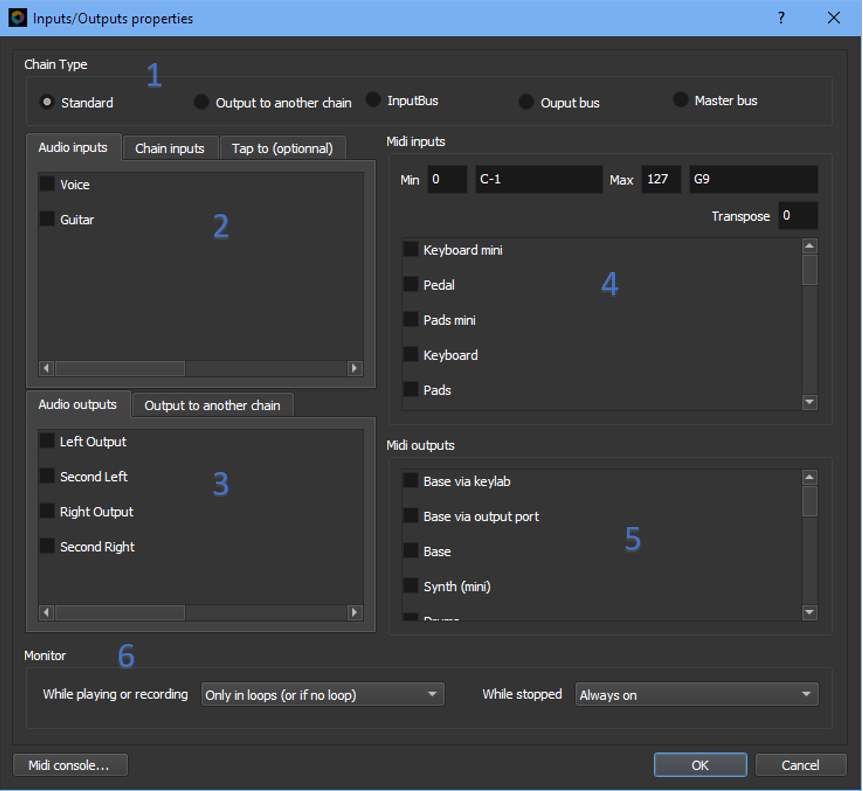
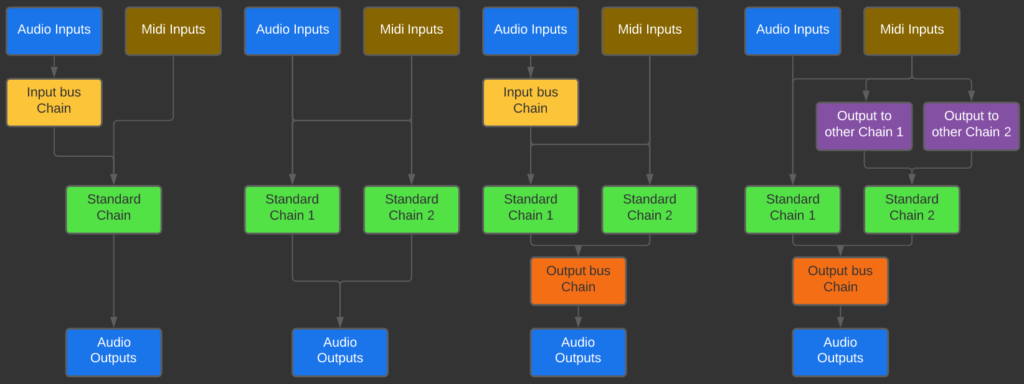
- Section 1: Chain type. Note: see below for Chains flow chart examples. See this link for a more detailed explanation of routing in LoopToGo.
- Standard (green in flow chart below): has audio and/or MIDI inputs and audio and/or MIDI outputs. A standard chain can also have another chain as input. This input chain must be set as « Output to another chain ». See this link for a more detailed explanation of routing in LoopToGo.
- Output to another chain (purple in flow chart below): has audio and/or MIDI inputs and a standard chain as output. Used to avoid using the same effects or instruments on different chains. The processing of all « Output to another chain » chain will all be done before the processing of the « Standard » chains. See this link for a more detailed explanation of routing in LoopToGo.
- Input Bus (yellow in flow chart below): only the audio input(s) are needed to be selected. The chain will be inserted between all other chains that use the same input and the audio interface. Used to apply a plugin (or gain value) to all the chains with the same input. There could be many Input buses on the same IO input. The processing for the « Input bus » chain is done before all the other chains. If there is more than one « Input bus » chains, the order of the processing is the same as the order in the Looper view. These chains will be shown at the most left in the console view (and separated from the other chains by a space). See this link for a more detailed explanation of routing in LoopToGo.
- Output bus (orange in flow chart below): only the audio output(s) are needed to be selected (« Tap to » can also be selected but this is optional). The chain will be inserted between all other chains that use the same mapped output and the mapped output. Used to apply a plugin (or gain value) to all the chains with the same outputs . There could be many Output bus on the same IO output. The processing for the « Output bus » chain is done after all the other chains. If there is more than one « Output bus » chains, the order of the processing is the same as the order in the Looper view. These chains will be shown at the most right in the console view (and separated from the other chains by a space) but just before Master Buses. Note that if you use Multi mapping for the outputs, Output Buses won’t act as a master bus. Use Master bus instead. See this link for a more detailed explanation of routing in LoopToGo.
- Master Bus (not shown in figure below): only the audio output(s) are needed to be selected (« Tap to » cannot be selected for a Master Bus). The chain will be inserted just before the real audio interface outputs. You specify a mapped outputs to select the corresponding real interface. If you have many mapped outputs to the same output, it does not matter which one you select. These chains will be shown at the most right in the console view (and separated from the other chains by a space) See this link for a more detailed explanation of routing in LoopToGo.
- Section 2: Audio inputs and Chain inputs (audio and MIDI). Select the inputs for the « Standard » chains and the « Output to another chain » chain. There is no need to select the input for the « Output bus » chain as it is the same as the output. It is recommended to use audio name mapping (Preferences dialog).
- Section 3: Select audio outputs or chain outputs (for « Output to another chain » chains). It is recommended to use audio name mapping (Preferences dialog).
- Section 4: Midi input
- Min: minimal note value accepted. This is usually used for splitting a keyboard.
- Max: maximal note value accepted. This is usually used for splitting a keyboard.
- Transpose: All MIDI notes are transposed by the number of semitones specified. Note that the original notes are recorded on a loop so changing this value will also apply to previously recorded loops.
- Section 4: Midi inputs selection. It is recommended to use MIDI name mapping (Preferences dialog) especially if you want to filter the events based on their MIDI channel.
- Section 5: Midi outputs selection. It is recommended to use MIDI name mapping (Preferences dialog) especially if you want to filter the events based on their MIDI channel.
- Section 6: Monitor configuration. There is a configuration for « Playing or recording » and a configuration for when the song is stopped.
- Playing or recording:
- Only in loop or when there are no loops on a track
- Always on (also called the invited musician mode)
- In loops or when track is selected
- Only in loops (muted if there are no loops on the track)
- Stopped:
- Always off
- While mouse is over track or widget
- Always On
- When track is selected
- Playing or recording:
Adding Instruments or Effects to a chain
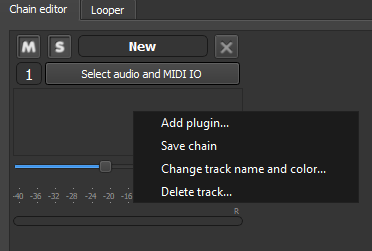
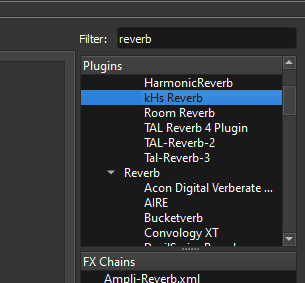
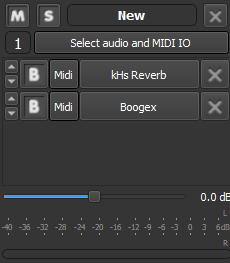
To add instruments or effects plugins to a chain, you can right-click on an empty space in the Chain widget and select ‘Add plugin…’ or drag and drop a plugin from the Plugin browser onto a chain. The plugin can be dropped onto the chain either in the Chain Editor or in the Console. If the Plugin Browser is not visible, you can make it appear in the View menu or by using the shortcut Ctrl-B. See images below
You can add as many plugins into a chain as you want. You can change the order of the plugins by using the small up and down arrows at the plugin widget right or simply drag and drop a plugin to its new position. You can also copy a plugin to another chain with drag and drop (holding shift will also copy the plugin’s parameters and configuration). If you want to copy a plugin into the same chain, hold the shift key while doing the drag and drop.
MIDI Track vs Audio Track
In LoopToGo, you don’t need to specify whether a track is a MIDI Track or an Audio Track. LoopToGo will automatically determine it based on the plugins and inputs used in the chain. This should come naturally when building a chain.
For example, a MIDI track will typically start with a MIDI plugin, such as an instrument, sequencer, or MIDI effects plugin, optionally followed by another MIDI plugin (for sequencers and MIDI effects) or audio effects plugins (for instruments). On the other hand, an audio track will have no MIDI plugins in the chain at all.
As for the inputs (audio signal or MIDI effects), they are sent to the first plugin only. This plugin will process whatever it is designed for—whether it’s an audio signal, MIDI events, both, or nothing. Therefore, it’s important to select the chain inputs according to the first plugin’s needs (or your desired outcome). Some plugins have options to pass MIDI events or not, such as certain sequencers.
It’s also worth noting that MIDI events used for MIDI learn are passed to all plugins, provided that the chain has been configured to accept at least one MIDI input.
Placing plugins in the wrong order can result in a chain producing no sound. For instance, if you place audio effects before a MIDI instrument, there will be no sound, as most audio plugins won’t pass MIDI events to the next plugin.
Sidechain
Note: For beginners in looping, it’s best to postpone learning about this concept as it’s more advanced and may not be immediately relevant.
LoopToGo supports the « Sidechain concept » (since Release 2.10.0). In digital music production, the « sidechain concept » refers to a technique where the input from one audio source, known as the « sidechain, » is used to dynamically control the processing of another audio source, typically referred to as the « main » or « primary » signal.
To use sidechain, you first need to have a plugin that supports this concept. In LoopToGo, there are two ways to determine if the plugin supports it:
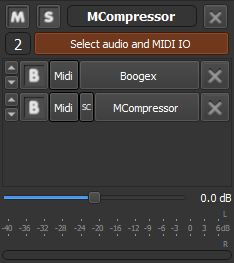
- Plugins that support sidechain will have a small ‘SC’ on their Plugin Widget.
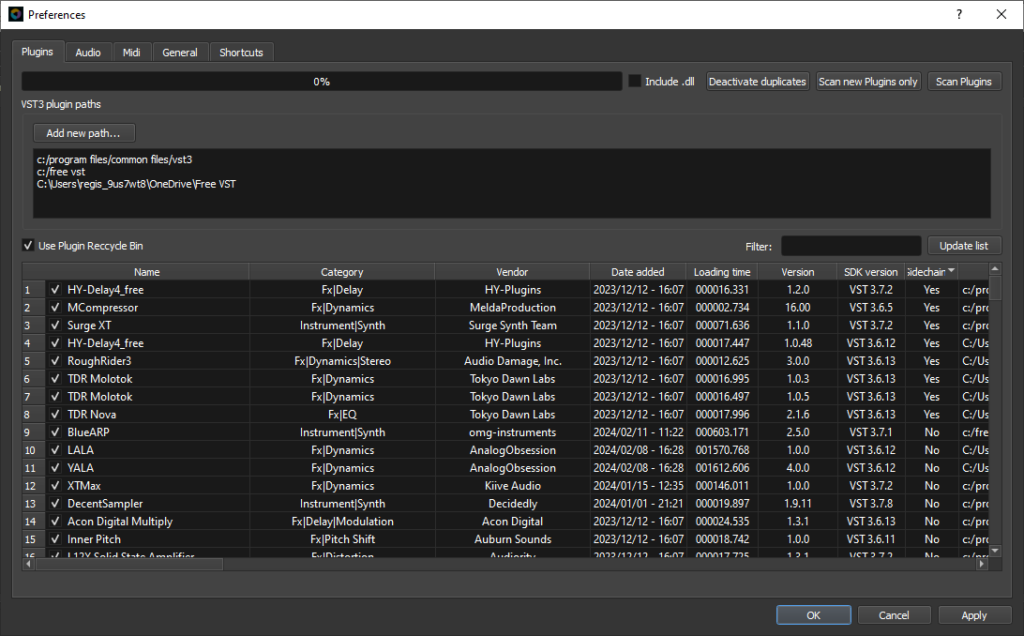
- In the Plugin list in the Preferences/Plugins dialog, there is a column named ‘Sidechain.’ The possible values for this column are ‘Yes,’ ‘No,’ or ‘?’. ‘Yes’ indicates that the plugin supports sidechain. The question mark ‘?’ indicates that this plugin has not been loaded since Release 2.10.0 (or later) was installed on your computer (you have to use it in a chain at least once to determine if the plugin supports sidechaining).
Using Sidechain
Configuring sidechain in LoopToGo is straightforward. Simply click on the ‘SC’ button and select the track(s) to use as sidechain input. You can use multiple tracks, and if so, they will be summed up before being sent to the plugin. In the plugin, you must indicate that you want to use an external sidechain. This step varies for each plugin and may have different names such as SC, Sidechain input, Ducking input, External input, etc. Refer to the plugin user manual if needed.
Note that if the sidechain track used is positioned after the track with the plugin utilizing the sidechain, the sidechain signal received by the plugin will be delayed by one buffer. This delay is typically not a significant issue for sidechain use.
If you want to use the sidechain concept to ‘make room’ for another chain (e.g., a drum kick in Chain B lowers the volume of the synth in Chain A), it’s straightforward. Simply add a compressor or EQ in Chain A and use Chain B as the Sidechain input.
However, if you want to change an effect’s behavior for a chain such as reverb or delay, you’ll need to split your chain into three parts:
- Chain A: The main chain with effects not affected by the sidechain. This chain will be configured to output to Chains B and C.
- Chain B: A standard chain with audio outputs selected. This chain can also be used by other chains.
- Chain C: A chain with the effects (reverb, delay, gate, etc.) that you want to control with a sidechain input. A sidechain effect such as a compressor or EQ must be placed after the effects and use Chain A as the Sidechain input.
Note: This chain configuration is very similar to the ‘Send’ concept in many DAWs, which is done without the use of Chain B. A future version of LoopToGo will likely provide a way to do it without using Chain B. Please contact us if you want to prioritize this feature
It is possible to reuse the exact same chain in different songs. However, this concept must be approached with caution by advanced users, as improper implementation can lead to unintended results.
Please note that it is possible to use Virtual MIDI cables to configure LoopToGo for using Persistent Chains across different songs as well as Shared Chains. Both methods present pros and cons. We highly recommend testing both methods before choosing an approach.
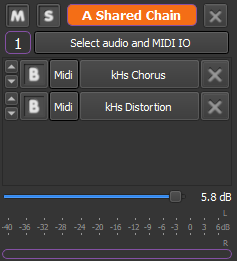
Here are the visual differences between a Shared Chain and a « Normal » Chain (use of blue color to indicate a Shared Chain).:

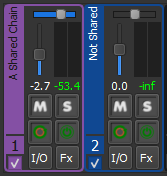
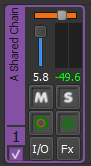
When a Chain Name is different from the Shared Chain Name used, the orange color is used instead of the blue color. To know the Shared name, simply move the mouse cursor over the Chain’s name.
When using Shared Chains, all configurations of a Chain (including plugins, plugin parameters, volume, pan, etc.) will be shared among related Shared Chains in other songs, except for configurations specific to the track (such as loops, quantization, and recording of current CC state). These track-related configurations are accessible via the track properties dialog window, accessible by right-clicking on the track’s name in Looper View.
It’s essential to understand that Shared Chains utilize standard Chain Files to exchange information between songs. A clear comprehension of this concept is crucial to avoid unintended situations. Please review the following details to ensure proper usage.
There are three methods to create a Shared Chain within a song:
- Right-click on an empty space in the Plugin section of a Chain and select « Share this chain. » If a chain with this name has never been created, a new Chain file will be generated. Note: Exercise caution when overwriting existing chain files with the same name, as this may affect other songs utilizing the shared chain. If not intentional, consider renaming the Chain before sharing.
- Right-click on an empty space in the Chain Editor View and select « Load Shared chain from Chain file… » Choose the desired Chain file from the selection.
- Hold down the ALT key and drag and drop a Chain file from the Chain Tree Browser (located to the right of the main window). Press CTRL-B to display the Tree Browser if it’s not visible.
- Careful consideration of this concept is crucial to avoid unintended changes to your songs.
- It’s important to refrain from overwriting an existing Shared Chain unless it’s absolutely necessary. LoopToGo will prompt you with a warning and require confirmation before proceeding with any overwrite.
- A Shared Chain is typically saved in a file with the same name as the Chain in your song, with a .xml extension. However, if you rename a Chain that is already shared, it will remain linked to the original Shared Chain file. Hovering your mouse over the Chain Name will display a tooltip showing both the Chain Name and the Shared Chain name. Note that renaming a Shared Chain will not update the name in all songs using it, but the sharing connection will remain intact.
- Each Shared Chain can only be used once within the same song. If you attempt to use it more than once, LoopToGo will prevent sharing or automatically assign a different Shared name depending on the context.
- When saving a song that uses Shared Chains, the Shared Chains configuration is stored both in the song file and in the Shared Chain file. If the Shared Chain file is deleted, reloading any song that uses it will recreate the Shared Chain file.
- A saved chain name can be different from the file name used to store the chain (in {user}/Documents/LoopToGo/FxChains). However, when using Shared Chains, the chain’s name used in the file will eventually be set to the file’s name. It could be a good idea to use a convention for naming Shared Chain files (using the prefix « S- » or your own convention).
- A Shared Chain information is saved with the autosave action and the user save action.
- For songs using Shared Chains created in release 2.13 or higher, opening them in a release prior to 2.13 will append the name of the Shared Chain followed by two double colons (::) to the Chain name (e.g., « Shared name::Chain name »). While loading the song in a release that supports Shared Chains, as long as the first part of the name (before the double colon) remains unchanged, the chain will retain its Shared property. To preserve any modifications made to the chain, ensure the song is loaded and saved in a new release supporting Shared Chains before loading other songs using the same Shared Chain.
Song playlists
To create or edit a Playlist:
- Right-click on the Playlist View and select « Create a Playlist » or « Edit a Playlist. » When creating a new playlist, a dialog will prompt you to enter a name. Make sure to choose a unique name. The default text editor will open with the current selected song (if any) for a new playlist, or with the existing playlist if you’re editing.
- Note: We recommend using Notepad++ to edit text files.
- In LoopToGo, select one or many songs in the Songs List Tree (middle right of LoopToGo main window)
- Right-click on one of the selected song and select « Copy song title(s) in clipboard »
- In the text editor, paste the songs (CTRL-V or Right-Click/Paste)
- Important: save the file in {Your document}/LoopToGo/Playlists as a .txt file. If you use another extension, the file won’t appear in the Playlist view.
To use the playlist:
- The playlists should be displayed in the right lower section of the main window
- Double-click on a playlist. The right part of the main window will change to show the playlist.
- You can drag and drop the songs into the main window to load them
- Note: You can also single-click on a playlist. The first song will be displayed at the left of the Transport section. Then, you can use the shortcuts to navigate and load a song (see below)
Shortcuts and MIDI event trigger for playlists:
Note: By default, there are no shortcuts associated with the use of the playlist but keyboard shortcuts and MIDI event triggers can be used to easily navigate and select songs in a playlist. It is suggested to use the ALT-Key for custom user shortcuts since these shortcuts are not used in LoopToGo by default (except ALT-1, ALT-2, etc.).
- To program the shortcuts, go to Preferences/Shortcuts and type « playlist » in the filter field, then enter. The following shortcuts should be listed:
- Playlist: Load selected: load the selected song in a playlist (3 button configuration)
- Playlist: Force Load selected: load the selected song in a playlist (3 button configuration)
- Playlist: Select previous: select previous song on a playlist (3 button configuration)
- Playlist: Select next: select next song on a playlist (3 button configuration)
- Playlist: Select previous and load: select previous song and load it (2 button configuration)
- Playlist: Select previous and Force load: select previous song and load it (2 button configuration)
- Playlist: Select next and load: select next song and load it (2 button configuration)
- Playlist: Select next and Force load: select next song and load it (2 button configuration)
If you right-click on the playlist view, you will be asked to save a snapshot for all songs in the playlist. You can also specify a name for the snapshots if you like. This is useful for keeping a « record » of every song at the end of a live show. LoopToGo will simply copy the saved song as snapshots. Note that if the current song is unsaved, LoopToGo will create two snapshots: one for the saved version and one for the unsaved one.
Note that when selecting the next or previous song in a playlist, LoopToGo will ask if you want to save the current song if it has been modified. This can be a problem in a show where you don’t easily have access to a keyboard. A simple way to avoid this problem is to assign two shortcuts to the same MIDI event: « Save song » and « Select previous and load » for example. To make sure you don’t erase a good performance by mistake, we suggest that you also assign « Save snapshot » to the same MIDI event.
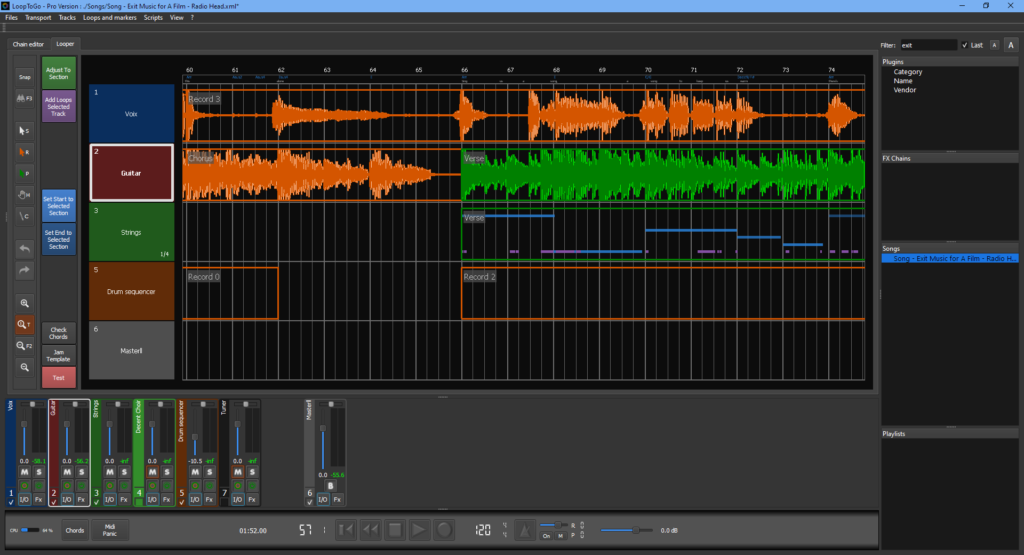
Main window – Looper editor

- Section 1: Looper area.
- Section 1a: edit mode selection
- Snap: snap mode. Click on the button to toggle through the different snapping modes or right-click to choose a specific snap mode. The snap mode can be the same as the display or a fix resolution.
- F3 (binoculars): enable or disable the permanent zoom mode for the Chords and lyrics
- S: select mode. Used to select, move or resize loops and to set the song tick position (by clicking outside a loop). To select a loop , a track or a marker, click on the loop, the track’s name or the marker. To select many loops/markers, hold down the shift key or draw a rectangle around the objects to be selected.
- R: record mode. Used to draw a record loop.
- P: play mode. Used to draw a play loop
- H: hand mode. Used to move the song view. CTRL-MOUSE_WHEEL is used for scaling the song view
- C: cut mode. Used to cut a loop into 2 loops.
- T: Toggle between scaled view and normal view. The other magnifying glasses (with – and +) decreases or increases the view vertically.
- Section 1b: Custom script buttons section. This section can be shown/hide in the View menu. See the script section for more details
- Section 1c: Track names
- In « Select mode », drag and drop the track name to change their order (it can also be done by dragging and dropping a chain in the Chain Editor View).
- Right-click to access the track menu:
- Lock all loops (audio and MIDI): locks all the track loops. The locked loops will not record (but will play) MIDI events and audio signal while recording a song.
- Lock all audio loops: will prevent recording audio on the loops for this track but the MIDI events will still be recorded.
- Lock all MIDI loops: will prevent recording of MIDI events for all the loops of this track but audio recording will be possible.
- Unlock all loops. Allows all recording loops to record audio and MIDI events.
- Change track color…: allows the user to choose a new color for the track. This is also possible by clicking on the name of the loop in the Console area.
- Duplicate track: Creates a new track with the same Fx chain and loops.
- Export audio and MIDI track (raw data): Export the track raw data to the song folder. A MIDI file (.mid) and an audio file (.wav) will be created
- Export MIDI track (quantized and humanized): Export the track MIDI data to the song folder taking into account the quantization and humanization parameters. Note: the MIDI filename is the same as the one used for « Export audio and MIDI track ».
- Delete track…: Deletes the track. A confirmation message will appear, since this action cannot be undone!
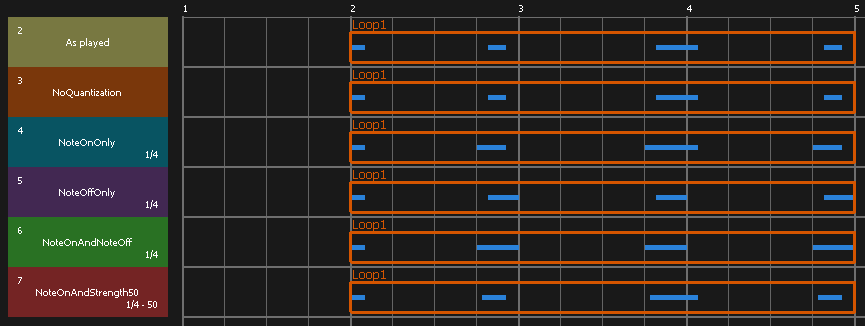
- Properties: allow to set the quantization and humanization parameters for the playing of the MIDI events (see also image below):
- Note On (Quantization): check to quantize the Note On to the quantization value
- Note Off (Quantization): check to quantize the Note Off to the quantization value
- Quantization value (Quantization)
- Strength (Quantization): how close the MIDI event will be to the quantized note. For example, if the note is 1.1 and the quantized note is 1.0, a Strength of 50% will bring the note to 1.05. A Strength of 0% has the same effect as No Quantization. A Strength of 100% will lead to full quantization
- Range (Humanization): random variation is applied to the note On position in bar (0 = no variation). Note that variation will be different for each Play loops note to avoid looping repetitiveness
- Bias (Humanization): bias applied to each note
- Velocity variation (Humanization): random variation applied to Note On velocity (volume). Note that variation will be different for each Play loops note to avoid looping repetitiveness. 0 means no variation and 100% means that the note velocity could be anywhere between the actual velocity and 0.
- Section 1d: bar information
- Section 1e: Chords and Lyrics display. CTRL-L toggles this display. To set up chords and lyrics, click on the Chords button on Section 7. When the Chords and Lyrics display is shown, the Binocular button appears in the top left corner of the Looper View. When this button is checked (red), the Chords and Lyrics will always be zoomed in, regardless of the song’s zoom factor.
- Section Looper drawing area: used to draw the song recording and playing parts. Behavior depends on the Edit mode selected (see above). Note that there are a lot of shortcuts very useful for editing and navigating in this view. See shortcuts tab in Preferences dialog for more details. Pro tip: you can select a loop, type a number of bars (up to 100) and press ENTER. The loop will be resized to that number of bars.
- Section 1a: edit mode selection
- Section 2: see description in « Main window – Chain Editor » section above.
- Section 3: see description in « Main window – Chain Editor » section above.
- Section 4: see description in « Main window – Chain Editor » section above.
- Section 5: see description in « Main window – Chain Editor » section above.
- Section 6: see description in « Main window – Chain Editor » section above.
- Section 7: see description in « Main window – Chain Editor » section above.
- Section 8: Song’s Structure view. To enable, select View/Song’s structure or CTRL-U. The structure is built from the Section Markers created by the user or from the bracketed comments in the chords editor. While the song is playing the Structure view will show which part (Section) is playing. To set the playhead position (while stopped or paused) or the playhead Start position (while playing), right-click on a section. While playing or recording, double click on a Section and the song will jump to that section at the end of the current section. A dot appears beside the section to indicate the jump. Also, a temporary green GoTo marker is shown in the looper view. While a song is stopped, a double-click on a section will set the song playhead position at this section. The Structure view and jump functionality can be controlled via these shortcuts:
- CTRL-Down: select next section
- CTRL-Up: select previous section
- CTRL-Shift-G: program a jump to the selected section at the end of the current section
Drawing and editing loops
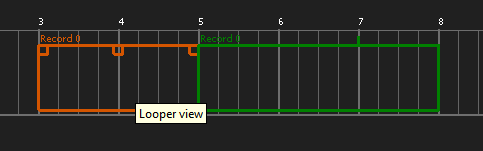
To add loops in the Looper view, simply select the loop drawing mode (Record or Play) at the left of the looper view: Orange arrow for the Record loop drawing mode and Green arrow for the Play loop drawing mode. Then, draw a loop on a track by clicking and dragging the mouse. The start, end and length of the loop will be shown in the right-bottom corner of LoopToGo. The start and the end of the loop will snap to the actual resolution. Use CTRL-Wheel to change the resolution. You can also hold the ALT key to draw without snapping though this is not recommended. Another way to add loops is by using these shortcuts:
- [number] A: adds a record loop on the selected track at the selected bar (if there is already a loop at this space, the loop will be added at the first available space at the right). The loop’s length will be set to the specified number of bars, or to the last value used if none is provided. If no loop length has ever been specified, the default length is 1 bar.
- [number] F: adds a play loop on the selected track at the selected bar (if there is already a loop at this space, the loop will be added at the first available space at the right). The play loop will be linked to the left closest record loop if any. The loop’s length will be set to the specified number of bars, or to the last value used if none is provided. If no loop length has ever been specified, the default length is 1 bar. Mnemonic: F is for Forward since P was already used to select the Play loop drawing mode.
- I: adds a 200 bars long (« Infinite ») play loop on the selected track at the selected bar. Note that the selected bar must be equal to or greater than a loop start. The play loop will be linked to the left closest record loop if any.
Loop properties
To set the properties of a loop, you can right-click on the loop and select Properties… in the context menu.
or
When in Select mode (shortcut: S), three small squares will appear at the top of a loop while hovering over it. The top left square is used to apply a Fade In effect on the loop. The top right square is used to apply a Fade Out effect on the loop. As for the center square, it will bring a Properties dialog when clicked. This dialog allows the user to change the loop volume and the loop name as well as other properties.
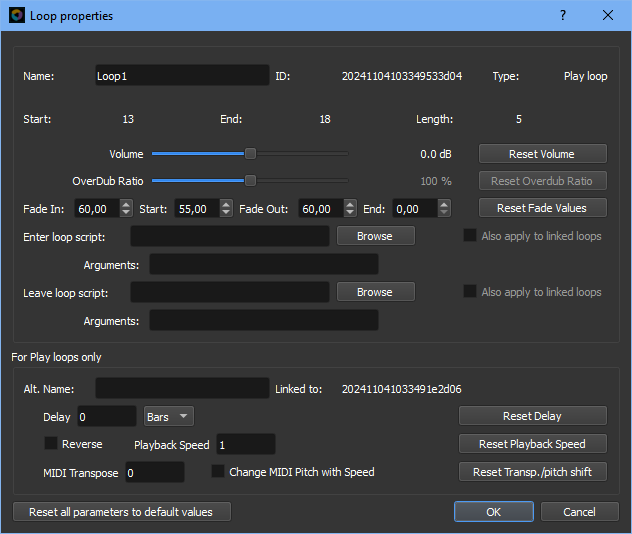
- Name: the loop’s name is shown and can be edited if the loop is a Record loop
- ID: ID of the loop. Can be used in scripts
- Type: either « Record loop » or « Play loop »
- Start, End and Length: Start, end and length of the loop in bars
- Volume: the loop volume
- Overdub ratio (for record loops only): this ratio will define how much the old audio data is used to blend with the new audio data in Jam Overdub Mode.
- Fade In, Start, Fade Out, End: Fading parameters. Note that the fade effects are applied to the output of the loop and not to the output of the chain. It means that for midi notes, the fading is applied to the note velocity (volume) before it is sent to the plugins. In some cases, there will be no audible effects. For example, if the velocity is not taken into account by the plugin or when a note is pressed for a long time. This behavior (fading applied to the output of a loop and not to the chain output) is needed as LoopToGo supports concurrent loops on the same chain.
- Fade In: Percentage of the loop for which the Fade In effect is applied
- Start: Starting volume for the Fade In effect
- Fade Out: Percentage of the loop where the Fade Out effect starts
- End: Ending volume for the Fade Out effect
- Enter loop script: script that will be executed when the playhead enters the loop. See https://looptogo.com/looptogo-scripting-language/ for more details.
- Also apply to linked loops: The linked play loops will also trigger the same script when the playhead enters them. This option is only available for Record loops
- Arguments: arguments provided to the script. Note: some system variables are also set. See the scripting language documentation for more details.
- Leave loop script: script that will be executed when the playhead leaves the loop. See https://looptogo.com/looptogo-scripting-language/ for more details.
- Also apply to linked loops: The linked play loops will also trigger the same script when the playhead leaves them. This option is only available for Record loops
- Arguments: arguments provided to the script. Note: some system variables are also set. See the scripting language documentation for more details.
- Alt. Name (for Play loops only): When not empty, this name is used for the play loop instead of the record loop.
- Delay (for Play loops only): a delay can be set between the start of the play loop and the start of the linked record loop. The delay can be set in Bars, Ticks, Seconds or msec
- Reverse (for Play loops only): a play loop can play backward. For a MIDI loop, the On notes and the Off notes are interchanged before reversing the loop. Note that the quantization will apply to the note Off. It is possible to create an audio reverse of a MIDI loop by sending the output of a MIDI track to an audio loop.
- Playback Speed (for Play loops only): change the speed of a play loop. For an audio loop the pitch will shift accordingly. For a Midi loops the pitch is kept unless « Change Midi Pitch with Speed » is checked. If a negative Playback Speed value is set, the loop will play in reverse
- Midi Transpose (for Play loops only): MIDI notes will be transposed by the number of semitones specified. This will add up to the MIDI pitch if any.
- Change Midi Pitch with Speed (for Play loops only): see « Play back Speed » above
If many loops were selected before showing the Properties dialog, the parameters will apply to the under mouse loop first and then a dialog will be shown to specify how the parameters will be applied to the other selected loops. Note that some parameters are applied to Record loops only, some are applied to Play loops only and some are applied to both types.
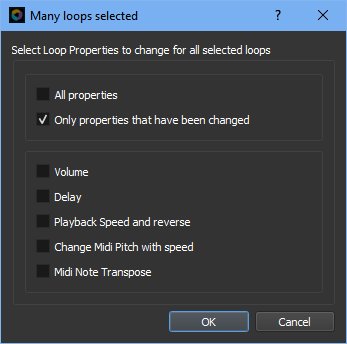
- All Parameters: parameters are applied to all selected loops even those that were not changed
- Only properties that have been changed: only properties that have been changed will be applied to all selected loops
- Volume: only the Volume parameter will be applied to all selected loops
- Delay: only the Delay parameter will be applied to all selected loops
- Playback speed and Reverse: only the Playback speed and the Reverse parameters will be applied to all selected loops
- Change Midi Pitch with speed: only the Change Midi Pitch parameter will be applied to all selected loops
- Midi Note Transpose: only the Midi Note Transpose parameters will be applied to all selected loops
Loop Context Menu
Right-clicking on a loop will open a context menu (some action items may or may not appear depending on the type and state of the loop):
Record Loop Menu
- Rename Loop: Allows the user to change a Record Loop’s name.
- Mute Loop (Unmute): Enables the user to mute the record loop while recording or while playing and recording.
- Lock Loop: Enables users to lock a record loop; audio only, MIDI only, or both.
- Save…: Allows the users to save the audio data or MIDI data to a file.
- Edit with External Editor: Allows the user to edit the audio or MIDI data with an external editor. Will use the default editors associated with the .wav and .mid extensions. The default editors can be set with the standard Windows file manager. Audacity and MidiEditor have been reported to work well with LoopToGo. Note that the export command must be used in Audacity to save the WAV file to the same location. Note that MidiEditor does not support Polyphonic Aftertouch (as of November 2023).
- Add Jam Marker at the Beginning: Adds a Jam Marker at the beginning of the loop.
- Compute BPM from audio data…: Shows a dialog box with the computed BPM and different ratios of the BPM. Two buttons allow changing the Song Tempo to match the Loop BPM or changing the Loop BPM (without altering the pitch) to match the Song Tempo. This feature is particularly useful when working with external audio recordings or when preparing a song based on an existing audio recording (e.g., a cover). For example, it can help ensure that loops, chords, and lyrics are properly aligned. This menu is only visible when the loop contains recorded audio data.
- Change pitch: Shows different options to change the pitch of the loop’s audio data without affecting its length. This menu is only visible when the loop contains recorded audio data.
- Delete Loop
- Clear loop (MIDI and audio data)…
- Select…
- Select linked loops
- Select loops on this track (right)
- Select loops on this track (left)
- Properties
Play Loop Menu
- Link to: Allows the user to choose a Record loop on the same track for the Play loop to be linked to.
- Use Alternative name for Play loop…: Allows to set a different name than the Linked record Loop name. When the mouse is over the loop, the Linked record Loop name is always shown.
- Set Delay, Start of Loop at Song Bar: Sets a loop delay corresponding to the distance between the start of the loop and the current song bar. This will make the play loop start playing back the record data that is currently at the song bar.
Record and Play loop Menu
- Add GoTo Marker: Adds a GoTo marker around the loop (or around all selected loops)
- Delete loop
- Select: Allows the users to make different selections
- Properties: Shows the Loop Properties Dialog
Main window – Persistent Chain Editor
Persistent chains concept
Persistent chains are chains that are automatically loaded at start up and automatically saved when exiting LoopToGo. They cannot be recorded or re-played in a song and usually, they are not active at the same time as the Song’s chains. Persistent chains are used for 2 main purposes: 1) having a default set of chains ready to use when loading a new song or simply between two songs. 2) having the possibility to adjust the sound of your show to the room/space without having to edit all the songs.
Persistent chains are mainly for advanced users. If you are new to LoopToGo, we suggest you skip this section. When you are familiar with how the chains are created in LoopToGo and how the routing is done, you might want to learn more about Persistent chains.
Creating Persistent chains
To create a persistent chain, you select the « Persistent chain Editor » tab. If the tab is not visible, you have enable it in « View/Persistent Chain Editor ». Then, simply create chains as you would normally do in the standard Chain Editor. As in the standard Chain Editor, you can create 4 different types of chains: « Standard », « Output to another chain », « Input bus » and « Output bus ».
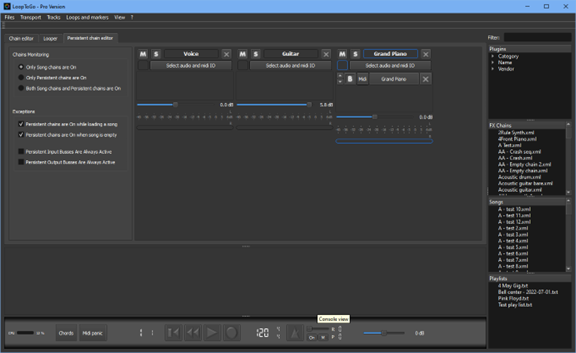
These chains have the same behavior as the « Song’s chains » with a few differences for the « Input bus » and the « Output bus » chains (as described below).
When the persistent chains are created, you can choose to use them, the song’s chains or both at the same time by selecting one of the first 3 options at the left of the Persistent Chain Editor tab. You will probably want to use the « Toggle Monitor Song and Persistent Chains » shortcut to do so.
To change the order of persistent chains, simply drag and drop the chain to its new position in the Persistent Chain Editor view.
To make the best use of Persistent chains, you can also set the following exceptions:
- Persistent chains are On while loading a song: The persistent chains will automatically turn on when the user loads a song. The persistent chains will remain on (and the new loaded song chains off) until one of the following occurs:
- The user hits Rewind, Rewind All, Play or Record
- The user selects « Only Song chains are On » on the Persistent Chain Editor tab
- The user triggers the « Toggle Monitor Song and Persistent Chains » shortcut
- Persistent chains are On when song is empty: Persistent chains will be automatically on when there is no chains in the standard Chain Editor.
- Persistent Input Busses are always active: all the Persistent Input busses will be active for the Song’s chains and the Persistent chains. The Persistent Input Busses will be processed before all other chains (including Song’s Input Busses chains if any). This feature can be useful to adjust the sound of a particular instrument or microphone at soundcheck without having to edit all your songs. For example, increasing or decreasing the volume of a guitar.
- Persistent Output Busses are always active: all the Persistent Output busses will be active for the Song’s chains and the Persistent chains. The Persistent Output Busses will be processed after all other chains (including Song’s Output Busses chains if any). This feature can be useful to adjust the overall sound at soundcheck without having to edit all your songs. For example, adding an equalizer to adjust to the amplifying system used.
Preferences dialog
To setup the program preferences, go to Files/Preferences…
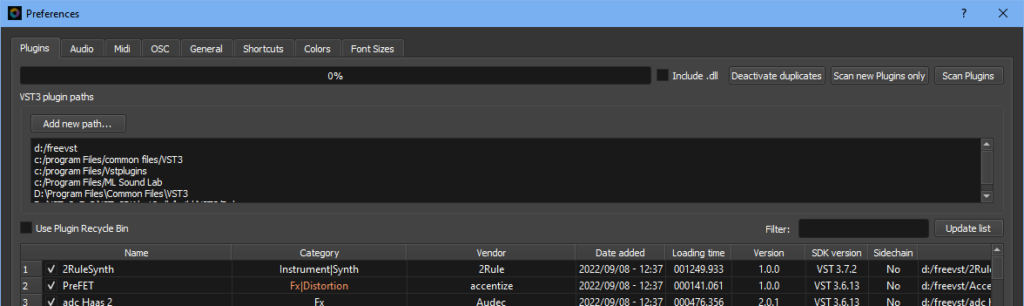
Plugins tab
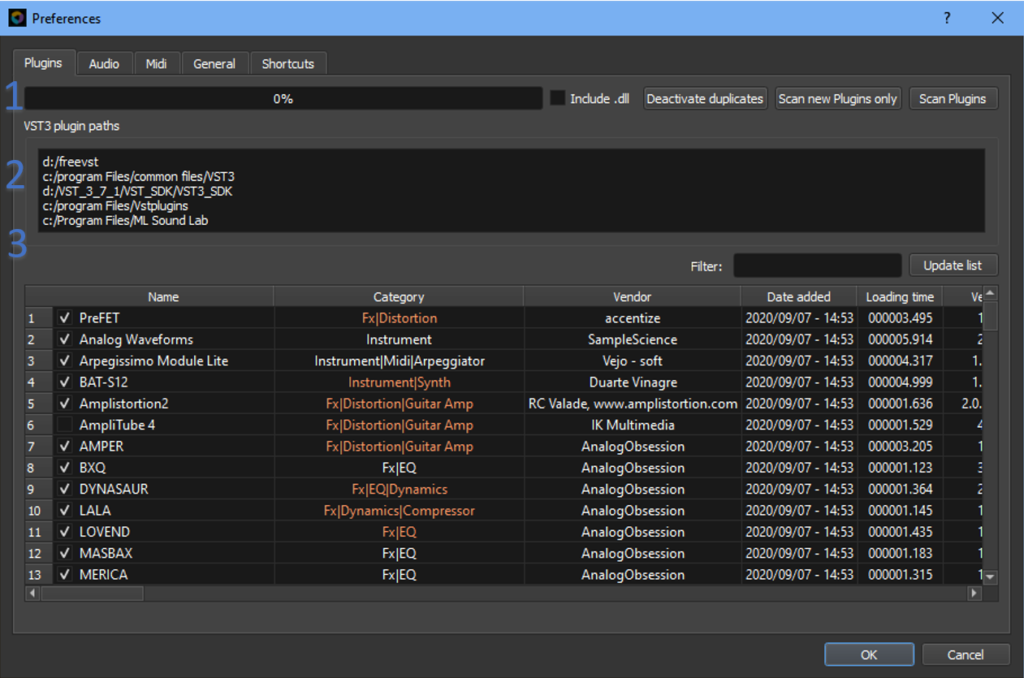
The plugin tab is composed of three sections (see image).
Section 1: Plugin scan
IMPORTANT: make sure you press Ok or Apply after doing a Plugin scan. Otherwise, if you close the Window with the X or the Cancel button, the new detected plugins won’t stay in the list.
- Loading meter: shows the loading progress in %
- Include .dll: most VST3 comes with the .VST3 extension but a few VST3 plugins uses the DLL extension (Ex. MONSTER plugins). If you check this box, LoopToGo will look into these files for VST3 plugins. If you have many VST2 plugins installed on the same folders, it will take longer to scan.
- Deactivate duplicates: If you have the same plugin installed in different folders, they will appear twice in the Plugin view tree. You can press this button to disable the duplicate plugins
- Scan new Plugins only: Scan only new plugins installed after the last scan. This is much faster than a full scan. You can select many folders to scan in Section 2. LoopToGo will also scan sub-folders so there is no need to list them.
- Scan Plugins: Scan all the folders listed in Section 2 for VST3 plugins. LoopToGo will also scan sub-folders so there is no need to list them.
Section 2: Folder list
- Folder list: Used to list all the folders in which the VST3 plugins are installed on your computer. By default, most of VST3 plugins will be installed in C:/program files/common files/VST3 but one might want to install them elsewhere. LoopToGo will also scan sub-folders so there is no need to list them.
Section 3: Plugin list
This section will be filled after a plugin scan is completed.
- Filter: type a word (or part of a word) then hit enter or click on the « Update list button » to display only a subset of the plugins containing these words.
- Name: name of the plugin. If you unchecked a plugin name (either manually or with the Deactivate duplicates button), the plugin will not show in the plugin view tree.
- Category: categories of the plugin as defined by the vendor. You can edit this field by clicking on it. All categories must be separated by the | symbol. When a field has been edited, the text will be orange. If you want to revert to the original categories, simply delete all the text.
- Vendor: the plugin vendor
- Date added: the date the plugins were added, this is very useful to see the latest added plugins by clicking on the header (Date added) to sort the plugins
- Loading time: time required to load the plugin when performing the scan. A song built with long loading time plugins will take much more time to load. Note that this value might vary from scan to scan since a scan process can be interrupted by other process.
- Version: the version of the plugin
- SDK version: the version of Steinberg SDK used to build the plugin
- Path: the path of the plugin
- CID: The CID of the plugin
Audio tab
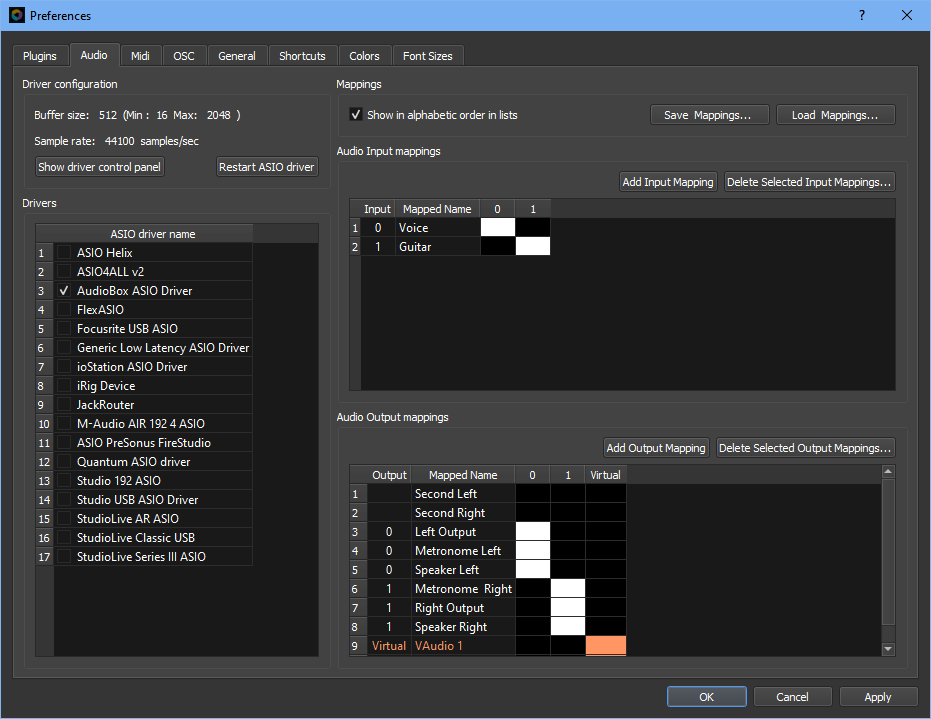
The Audio tab is composed of five sections: Driver Configuration, Drivers, Mappings, Audio Input Mappings, and Audio Output Mappings (see image).
Section 1: Driver Configuration
- Buffer size: Sets the buffer size of the selected ASIO driver. The minimum and maximum possible sizes for the driver are also shown.
Important: A lower buffer size reduces latency but increases CPU usage. Typically, a buffer length of 256 or less results in no perceptible latency. A buffer length of 512 might also be acceptable. - Sample rate: Displays the sample rate of the selected ASIO driver.
- Show driver control panel: Opens the ASIO driver’s configuration panel. Note that not all ASIO drivers support this functionality (e.g., PreSonus as of November 2021). For drivers that do not display their control panel, you must access it via the standard Windows application menu.
- Note: After changing the driver configuration, you must click « Restart ASIO Driver » for the new settings to take effect in LoopToGo. Changing the ASIO driver configuration will affect pre-recorded audio loops and render them unusable.
- Restart ASIO Driver: Applies the driver configuration changes. The Buffer size and Sample rate values will be updated.
Section 2: Drivers
- ASIO driver name: LoopToGo lists all ASIO drivers installed on your computer. Select the driver corresponding to your audio interface.
Note: Only one ASIO driver can be selected at a time, as this is a limitation of the ASIO protocol on Windows. If you have multiple audio interfaces and want to use them all simultaneously, you might try the ASIO4ALL driver. Results may vary depending on your hardware setup.
Section 3: Mappings
It is highly recommended to set up I/O mappings before configuring a song. Mapping allows you to assign meaningful names to channels instead of generic ones. This ensures that you can reuse song templates across different hardware setups (e.g., studio vs. live gig).
- Show in alphabetic order in lists: In other areas of the application where mappings are selected, they can be displayed either alphabetically or in physical order. This can also be adjusted by right-clicking the list and selecting the desired option.
- Save and Load mappings buttons: These buttons are useful for working with different hardware configurations on the same computer. However, in most cases, it is unnecessary to use these buttons, as mappings are automatically saved and retrieved.
Audio Input mappings
- Add Input Mapping: Opens a window to select a physical input port and assign a mapping name.
- Delete Selected Input Mappings: Deletes the selected mapping. To select a mapping, click on the port number in the Input column.
- Columns:
- Input: Displays the physical I/O port used by the mapping. Click a cell to select the mapping (e.g., for deletion). Click the column heading to sort by input ports.
- Mapped name: Click on the name to edit the mapping. Click the heading to sort alphabetically.
- Other columns: Display which physical input ports are used. Click a black cell to change the port.
Audio Output mappings
- Add Output Mapping: Opens a window to select a physical output port and assign a mapping name.
- Delete Selected Output Mappings: Deletes the selected mapping. To select a mapping, click on the port number in the Output column.
- Columns:
- Output: Displays the physical I/O port used by the mapping. Click a cell to select the mapping (e.g., for deletion). Click the column heading to sort by output ports.
- Mapped name: Click on the name to edit the mapping. Click the heading to sort alphabetically.
- Other columns: Display which physical output ports are used. Click a black cell to change the port.
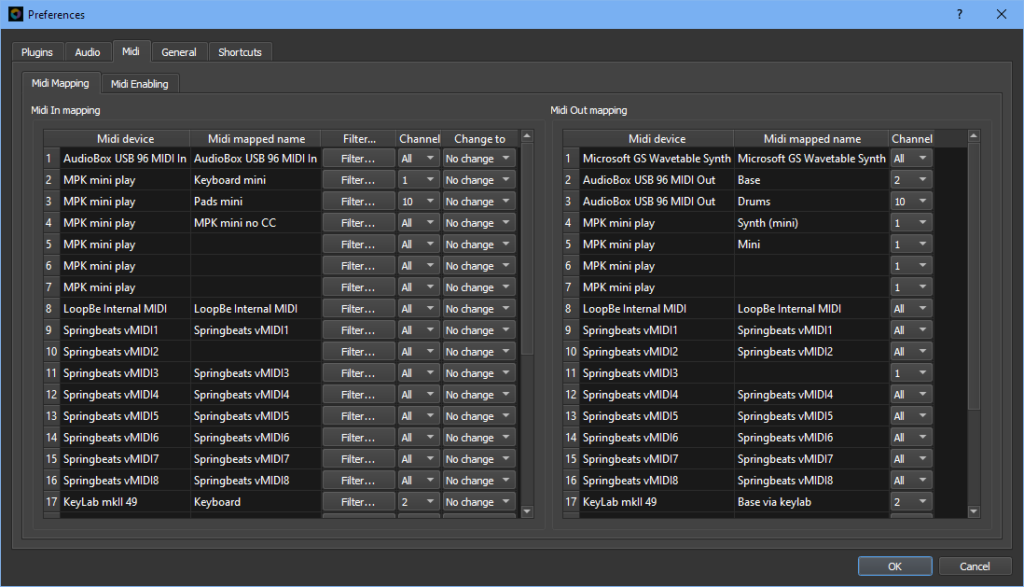
Midi tab
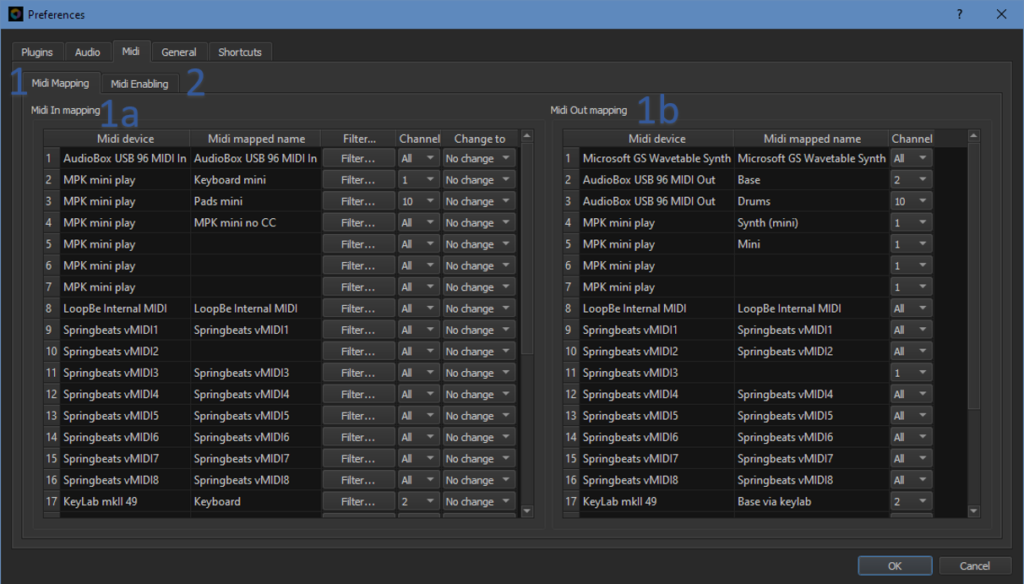
The MIDI tab is divided into 2 other tabs.
Tab 1: Midi mapping
The first tab (Midi mappings) lists all input and output MIDI devices of your system and allows you to create mapped name. All devices will be available with their original name for use in LoopToGo without any particular actions but we highly recommend that you use name mapping to assure a better interoperability of your templates. Furthermore, you can create many mapped names for the same device. You can also select different MIDI channels. This can be useful for MIDI keyboard with keys, pads and control. You can create three different mappings and easily associate them to different MIDI instruments (Fx Chains).
Section 1a: Midi In mapping
- Midi device: list of all MIDI devices of that can be used as input in LoopToGo
- Midi mapped name: user selectable mapped name for the MIDI input. Left clicking on the name will allow the user to change the name. Right-clicking on the name will show a context menu allowing the user to add another mapped name to the same MIDI device or to remove a mapped name.
- Channel: the MIDI channel associated to the mapped name. Clicking on the channel number allows the user to select a particular channel or all the channels.
Section 1b: Midi Out mapping
The Midi Out mapping section is identical to the Midi In mapping section but is used to map the external (physical) MIDI instruments. See section above for details.
Virtual MIDI Devices (Virtual MIDI Cables)
In LoopToGo, you can create Virtual MIDI Devices, particularly useful for situations where you need to send MIDI messages between chains or, more commonly, between a script and a chain without relying on Real MIDI devices. Virtual MIDI devices, distinct from Real MIDI devices, exhibit a few key differences that liken them to MIDI cables:
- Always Paired: Virtual MIDI devices are configured in pairs, one in the MIDI In mapping section and the other in the MIDI Out section. Both ends share the same name, functioning as a single virtual cable with two ends.
- Universal MIDI Channel Transmission: Virtual MIDI cables do not support MIDI channel filtering at the input or channel adjustment at the output. They transport MIDI events across all MIDI channels.
It’s important to note that you can still use the Filter button to filter out specific types of events.
To create a Virtual MIDI device, simply right-click on any MIDI device and select ‘Add a new Virtual Mapping.
Please note that it is possible to use Virtual MIDI cables to configure LoopToGo for using Persistent Chains across different songs as well as Shared Chains. Both methods present pros and cons. We highly recommend testing both methods before choosing an approach.
Tab 2: Midi Enabling
The second tab (Midi Enabling) allows you to disable or enable a specific Midi devices. To do so, simply click on the Active field corresponding to the device. The new state will take effect immediately. There are 2 columns, one for Midi In devices and one for Midi Out devices. Disabling a device is useful if you want to use it in another application while LoopToGo is running.
Note that if the devices as an input port and an output port, it might be necessary to disable both before using it in another application.
OSC tab
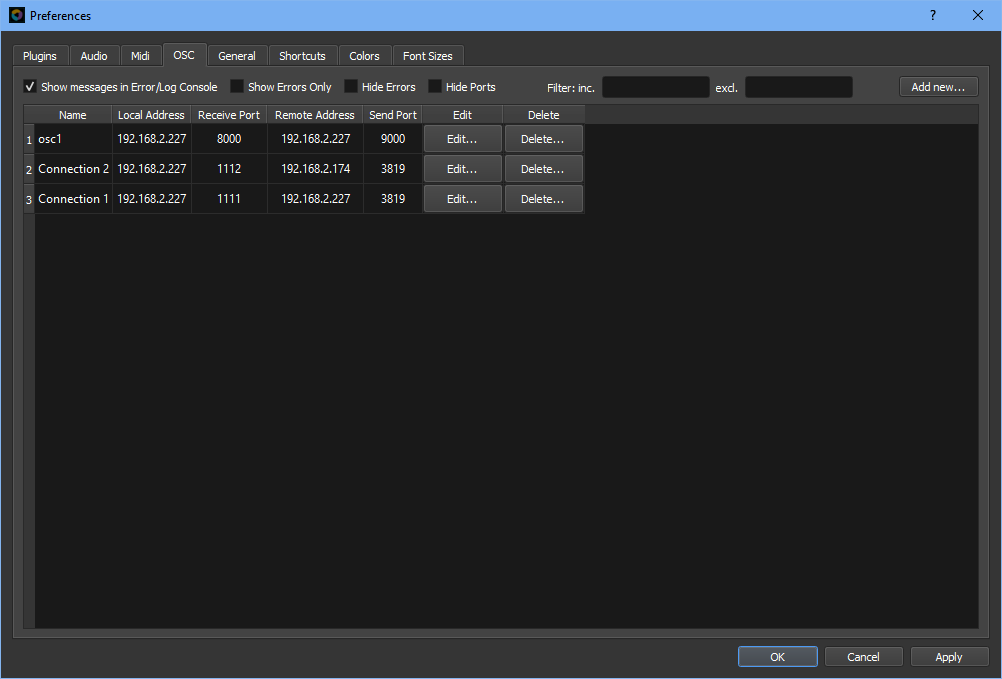
This tab allows the user to manage (create, edit, and delete) OSC connections. It also enables the logging of messages in the Error/Log console for debugging purposes. When the « Show messages in Error/Log Console » option is checked, various filtering tools are displayed to assist in debugging. See the OSC Protocol section for more details on how to use the OSC protocol with LoopToGo.
General tab
- Auto save frequency: choose the period at which the auto save is done or « Never » to disable this feature
- Auto save snapshot after recording from bar 1 to end of last loop: When checked a snapshot will be automatically saved if a song is fully recorded (from bar 1 to the end of the last loop – or after)
- Refresh rate: refresh rate of the looper graphical interface. Range goes from 15 Hz to 60 Hz. We recommend using 60 Hz but lower rates are available for low performance graphic cards. LoopToGo has to be restarted after this parameter is changed.
- Audio display sampling: this parameter affect how LoopToGo displays the audio signal of a loop. A choice of 1/n means that LoopToGo will take into account 1/n samples to evaluate the maximal value for a pixel. If you choose 1/1 (cursor at left), LoopToGo will display the maximal value of all values that should be displayed at a particular pixels. This is the most accurate method but it is CPU demanding. A setting of of 1/250 is a good compromise.
- Loop amplitude max value: use to change the vertical range of loops. Can visually help to keep enough « headroom » in your recording
- Audio Input Display: You can choose to display only left or right audio signal or both. Could be useful for slow computers. When both is chosen, the right signal will be lighter.
- Midi note transparency: When enabled, MIDI note transparency is linked to the MIDI note velocity, with higher velocity notes being less transparent. When disabled, notes remain fully opaque. This feature is particularly useful in Jam mode when the Overdub ratio is different from 100%.
- Max zoom: When using CTRL-Wheel to zoom in, the maximum zoom is restricted by this value, specified in pixels per bar.
- Default zoom: When utilizing the F2 shortcut to toggle between Zoom In and Zoom all, the Zoom In strength is determined by this value, specified in pixels per bar.
- Lyrics zoom: When the « Always Zoomed Chords and Lyrics » feature is enabled (Binocular Button), the Zoom value for the Chords and Lyrics display is determined by this value, specified in pixels per bar.
- Clear all audio and MIDI loops when recording begins at bar 1
- Clear jam loops when record starts at or before beginning of jam loops. See Jam mode section for more details
- Activate all Goto markers when recording begins at bar 1.
- Include resume action in Jam mode cycle: this is useful if you want to use only one shortcut for the Jam mode in a live performance
Shortcuts tab
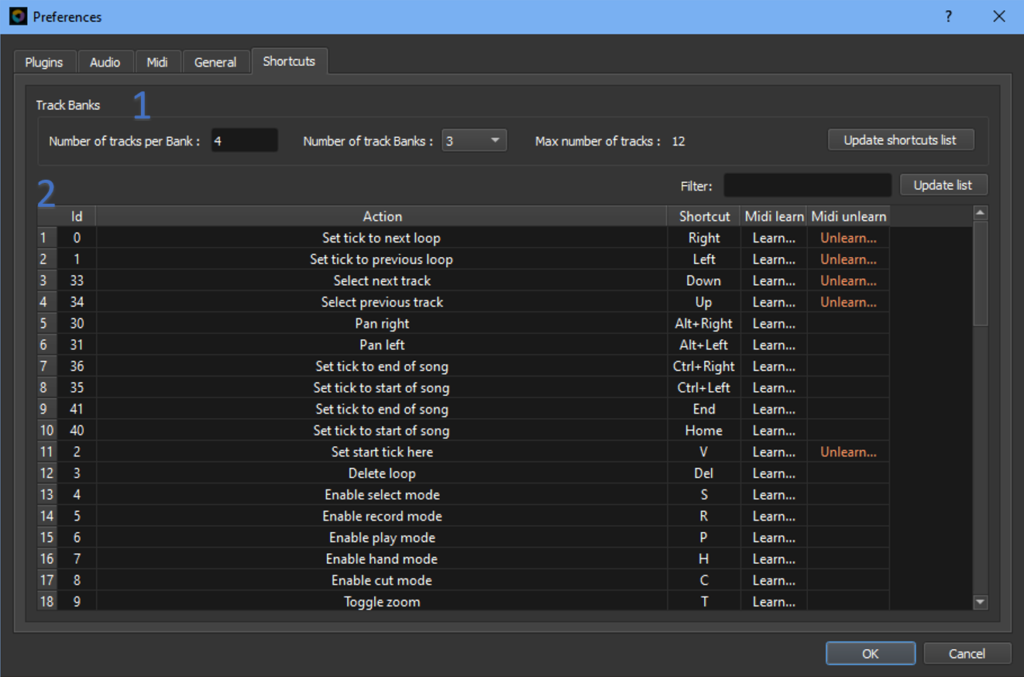
- Section 1: bank settings (used for Track mute/unmute, Track volume and Track select shortcuts). Tip: type « Track » in the filter to display the shortcuts associated with the Bank concept.
- Number of tracks per Bank: this value should be set to the number of track supported by your MIDI controller. For example, if you have 4 volume sliders on your MIDI keyboard, set this value to 4. If you don’t have a MIDI controller and only use a computer keyboard, we suggest you set this value to 8. The track numbers will appear in the looper view and console view up to this number.
- Number of track Banks: this value is used to limit the number of banks. In most case, you can set it to a high number to make sure that you can cycle through all your tracks (don’t worry, LoopToGo won’t cycle through empty banks). For example, if you have 20 tracks and a MIDI controller supporting 8 tracks, you can set this value to 3. When you hit the « Bank button » on the main window, it will cycle through Bank 1, 2 and 3 to address all the 20 tracks (8*3 = 24). If you have a significant number of tracks, it is likely that you won’t want to change settings on some tracks. You can put these tracks at the end of the track list and limit the « Number of track Banks » so you don’t cycle trough this tracks. As a matter of fact, this is the purpose of this parameter.
- Max number of tracks: it is the maximum tracks that you will be able to address. It computed as the « Number of tracks per bank » times the « Number of track Banks ».
- Update shortcuts list: click on this button after changing the « Number of tracks per Bank ». It will create this number of shortcuts for Track mute/unmute, Track volume and Track select. Then you will be able to link these shortcut to your MIDI controller button, slider and/or knob.
- Section 2: shortcut display and management
- Filter: use to filter the shortcut list with a word (or part of a word). Hit Enter or click on « Update list » after changing the filter.
- Id: Id of the shortcut
- Action: description of the shortcut
- Shortcut: keyboards sequence to trigger the action. Click on the shortcut to customize a shortcut. A shortcut that has been customized will be shown in orange. To reset the shortcut to its default value, click on the shortcut and hit the « Reset to default shortcut » button.
- Midi learn: clicking this cell will show a dialog allowing the user to associate a MIDI event to the shortcut. Many MIDI events can be linked to a shortcut. See « Midi learn » section for more details.
- Midi unlearn: clicking this cell will show a dialog allowing the user to delete a MIDI event linked to the shortcut
Colors Tabs
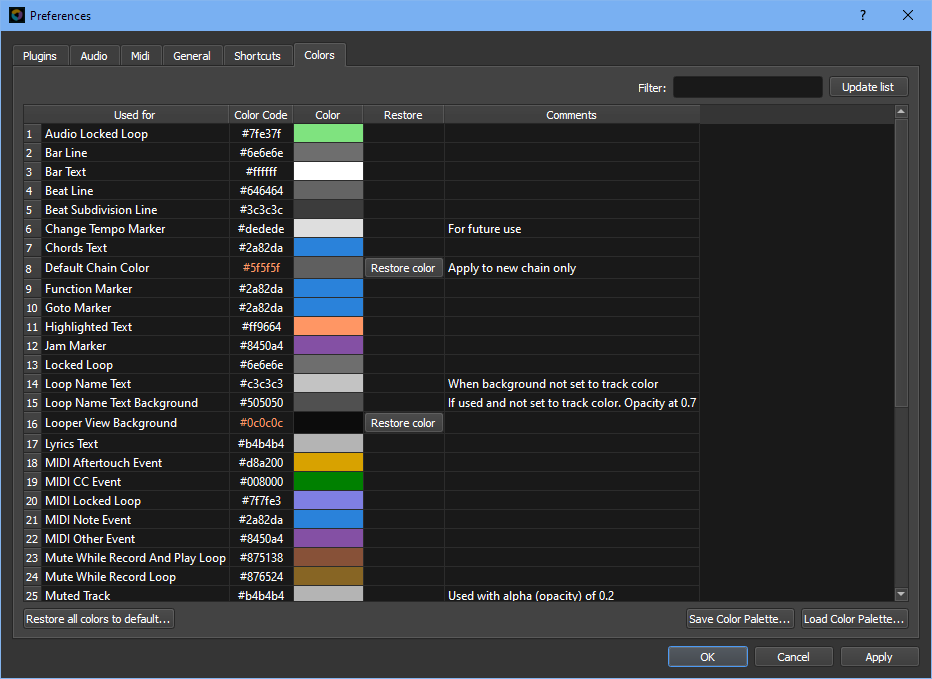
The Colors tab allows users to customize the color of most items used in the looper view, as well as a few other items’ colors such as the « highlight text » color.
- Used for: Provides a description of the item.
- Color code: Standard color code format (#RRGGBB). When an item’s color is customized, the code will be displayed in orange (or another color if the « highlight text » color has been changed). Tip: Clicking on this column heading will sort the items by color, making it easier to find a specific item by its color.
- Color: Displays the current color. Clicking on the color brings up a dialog that allows users to change the color.
- Restore: If an item’s color has been changed, a « Restore » button will be displayed in this column, allowing the user to restore the default color.
- Comments: Provides useful comments for item colors.
- Save Color Palette…: Allows users to save a palette.
Midi learn
LoopToGo allows the user to control native functions (main volume, transport actions, chain volume, etc.), and plugin parameters with MIDI events. The association between a MIDI event and a function or parameters is called « Midi learn ». There are different ways to initiate a MIDI learn process but the same user interface is always used.
Important! For the general functions (Transport, main volume, etc.). LoopToGo listens to all MIDI devices. For functions associated to a chain or a plugin, the MIDI device must be set as an input device (via the « Select audio and MIDI IO » buttons)
How to initiate MIDI learn
For Native functions, right-clicking on a interface button or either in the shortcut dialog (Files/Preferences/Shortcut). Select « Midi learn »
Plugin: by clicking the Midi button located at the right of the plugins button (in Chain Editor or in the Console after enabling the plugin view via the Fx button)
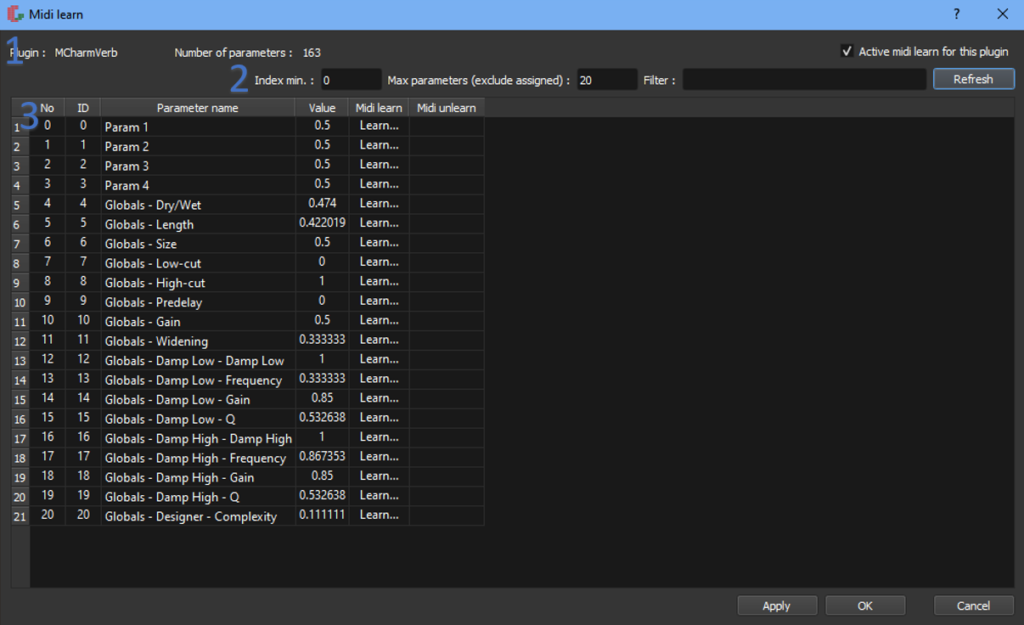
- Section 1:
- Plugin: plugin’s name
- Number of parameters: number of parameters that the plugin offers for MIDI learn
- Active MIDI learn for this plugin: if unchecked, all the MIDI learn functionality will be disabled for this plugin
- Section 2:
- Index min: First plugin to display (no). Press enter or Refresh to update the view.
- Max parameters: max number of parameters shown. The parameters already assigned will always be shown. Press enter or Refresh to update the view.
- Filter: only display the parameters that contains this string. Empty equals no filter. Press enter or Refresh to update the view.
- Refresh: refresh the view
- Section 3:
- No: number of the parameters
- ID: Id of the parameters
- Parameter name: parameter’s name
- Value: actual value of the parameter. Press Refresh to update this value.
- Midi learn: click on this cell to initiate the Midi learn process
- Midi Unlearn: click on this cell to show the Unlearn MIDI dialog
The Midi learn dialog

- Section 1: Midi event type and parameters
- Gate: trigger at the nth events. This is useful for single action (like transport action and other shortcut actions) when the MIDI controller uses the velocity to differentiate different buttons. When a MIDI button sends more than one MIDI event, you can select which event will trigger the action. « Velocity » parameter is also used to trigger an event.
- Control: the value of the control (0 to 127), also referred to « Velocity » will be used as the parameters. If necessary, it will be scale to fit between Min and Max. This is useful for changing continuous parameters with MIDI knobs for example but can also be used to trigger an event that does not have a parameter.
- Toggle: the value sent to the parameters will alternate between Min and Max. The events triggered again before the debouncing time are ignored. This is useful for changing on/off parameters with MIDI footswitches or pads for example. « Velocity » parameter is not used to trigger an event.
- Pitch Bend: use to associate the Pitch Bend event to a shortcut or feature. The MIDI Pitch bend event is different from other Control so it needs its own event.
- Any event: Useful for calling a script when any event is triggered. Usually you will pass the MIDI data to the script and do the processing in the script. You can filter the event with the checkboxes Device, Status and Channel. For example, if you only check the Device checkbox, all events from a device will trigger the event.
Important note
For Control, the triggering is done with msg, status, channel and note. The velocity is then used as a parameter. For example, a volume.
For Toggle, the triggering is done with msg, status, channel and note. The velocity is not used. A toggling intern flag is used as a parameter.
For Gate, the triggering is done with msg, status, channel, note and velocity. There is no parameter, it is used only for triggering
Tip: the Midi Console can be helpful in determining which type to use. See below for how to show and use the Midi Console.
- Section 2: shows the event received. Use the drop down menu to select event from a particular MIDI channel
- Section 3: Check the box to create a MIDI learn specific to a song meaning when a song is saved the MIDI learn will be saved and reloaded with the song. If another song is loaded, the MIDI learn will be deleted.
The Midi edit/unlearn dialog

The Midi unlearn dialog list all the MIDI event associated to a function. Simply click on Unlearn to remove the MIDI event association or on Edit to change or relearn the midi event.
Midi console
Using MIDI instruments and controllers in a live performance can bring a lot of flexibility but the setup is sometimes challenging. To ease the configuration of your Midi gears, LoopToGo provides a Midi console in which all MIDI messages (in and out) will be displayed. Note that the MIDI events are not recorded when the console is not shown. To use the MIDI console, select « View/Show Midi Console… » on the Main Window top menus.
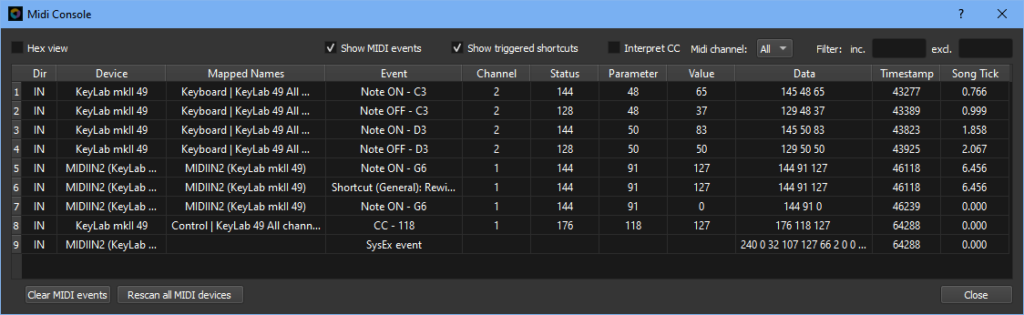
- Hex view: When checked, columns « Channel », « Status », « Parameter », « Value » and « Data » will be shown in hexadecimal format.
- Show MIDI events. When checked, will show all MIDI events unless there is filtering (mdi channel or text)
- Show triggered shortcuts: When checked, will show which shortcut is triggered by MIDI events. This is very useful to debug a MIDI mapping problem. Note that it wont show the computer keyboard events.
- Interpret CC. Utilize the MIDI standard notation for CC events. Note that not all manufacturers conform to this standard.
- Midi channel: Will show only the MIDI events on a specified channel or all events if All is selected. The filter will be applied to the next events.
- Filter inc.: Will only show the events containing the text specified in this field. The filter will be applied to the next events.
- Filter excl.: Will only show the events not containing the text specified in this field. The filter will be applied to the next events.
- Clear MIDI events: Clear all the Midi events shown
- Rescan all MIDI devices: Force LoopToGo to do a new scan of all connected MIDI devices. Note that this is not usually necessary since LoopToGo will automatically detect if a new Midi device is connected (or if a Midi device is disconnected and reconnected). However, some MIDI devices are not properly reset when disconnected and reconnected. This button will circumvent this problem.
- Close: Will close the Midi console. No more events will be recorded
Plugin CPU Usage Console
The « Plugin CPU Usage Console » (PCUC) is a tool designed to help the user chose the best plugins when it comes to CPU performance. As a matter of fact, in a live performance context, it is an absolute necessity that all plugins are processed within a buffer timeframe. If not, it will result in a unpleasant noise. There are many reasons why the CPU would not have enough time to achieve all it has to do within a buffer timeframe but the plugin processing is an important one. Choosing the least CPU demanding plugin for a given task is very important.
The PCUC is a great tool than can help you make smart choices. Click on View/Show Plugin CPU Usage Console… to show the PCUC. Note that the data are gathered only when the PCUC is shown. When the dialog is first shown, a few data are presented. You have to manually Update the data from time to time with the corresponding button. You can also Reset the data with a button. Note that all the column can be sort by pressing the corresponding column’s name.
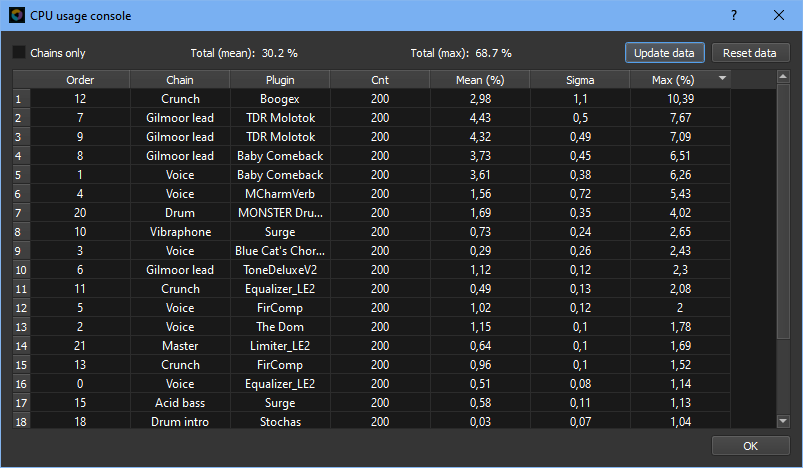
- Chains only: Only shows a line for each chain if checked (hide plugins details)
- Total (mean): sum of all %mean
- Total (max): sum of all maximum %. It is the worst case scenario. Keeping this number below 100 % will almost guarantee that the CPU will never go above 100% (say for a whole song). However, if this number is above 100% you might still be OK since it’s the worst case scenario (all plugins took their longest time to process)
- Update data: will show the latest data for the active plugins of the active chains
- Reset data: will reset the data counter as well as the mean and the sigma values
- Order: the order in which the plugins (or chains if « Chains only is checked ») are processed
- Chain: name of the chain
- Plugin (or « Nb plugins » if « Chains only » is checked)
- Cnt: number of data collected
- Mean (%): mean of CPU % used by the plugins (or Chains if « Chains only » is checked)
- Sigma(%): standard deviation of CPU %used by the plugins (or Chains if « Chains only » is checked). Note: this is an approximation. The approximation get better as there are more data.
- Max (%): max of CPU % used by the plugins (or Chains if « Chains only » is checked). This is the most important indicator. To have a realistic value, you should compute this value in the same context of the song. For example, for a MIDI instrument, you should play the instrument and update the data. For some plugins, it is necessary to reset the data after changing parameters. For example, if you load new samples in a sampler, the processing time can go temporary high and will not represent what would happens in a song.
Export Song Tool
The Export Song Tool allows you to export a pre-recorded song, or a specific segment of it, into a .wav file. You can customize the export using the following settings:

- Select Physical, Track or Mapped Outputs: Auto-exclusive radio buttons that affect the way you choose which outputs are exported into the audio file.
- Physical Outputs: The list of Physical Outputs of the Audio Interface will be shown for the Left and Right channel sources, along with the corresponding tracks using these outputs. All audio routed to the selected physical output will be exported. By default, Output 0 is selected for the Left channel and Output 1 is selected for the Right Channel.
- Track Outputs: The list of tracks with their corresponding mapped outputs will be shown. It is possible to choose exactly which tracks will be recorded. In this configuration, the left and right channels are the same as those used in the tracks.
- Mapped Outputs: The list of all mapped outputs with their corresponding Physical Outputs, as well as which tracks use them, will be shown. It is possible to select which Mapped outputs are used on each channel (left and right).
- Start of exported audio (in bars): By default, this is 1. The corresponding buttons can be used to change the value, or it can be set manually.
- End of exported audio (in bars): By default, this is 1 bar after the last song loop or marker. The corresponding buttons can be used to change the value, or it can be set manually.
- Show in Folder…: This button is used to show the folder where the song was exported. The button is disabled as long as no song has been exported.
- Export Audio…: This button starts the export process.
- Cancel: This button is enabled while the export process is going on and can be used to stop it.
- Close: Closes the dialog window.
Live Audio Recorder
The Live Audio Recorder can be used to record audio while jamming or when a song includes Stop, Pause, Goto markers, or Jamming sections to capture the entire performance. The tool has two display modes for convenience: Full View and Compact View. The Full View allows access to all configuration parameters, whereas the Compact View is more practical for use once the configuration is set.


There are many options to customize the recording:
- Select Physical, Track or Mapped Outputs (Full View only): This uses the same interface as the Export Song Tool. See details above.
- Continuous Loop Button
- In recording mode:
- Enable or disable this button to select the behavior when the recording reaches the end of the allocated memory: Stop or Record Over.
- When enabled, the beginning of the recording is overwritten (lost) when the playhead reaches the end of the memory.
- This is useful when jamming or searching for inspiration.
- In playback mode:
- The playhead automatically loops back to the beginning of the recording and continues playing.
- In recording mode:
- Drag Port: After a recording has been made, you can use this icon to drag the audio onto the Looper view or into an external audio application that supports drag-and-drop.
- Max (Full View only): This sets the maximum duration of the recording in minutes. The maximum allowed is 20 minutes. Note that depending on your computer’s capacity, choosing a high duration may lead to a temporary freeze of LoopToGo while the memory is being reserved.
- Play Button: Press this button to play the audio after a recording has been completed. While playing, you can use either the Play or Record button to stop. After stopping, you can click on the progress bar to manually set the playhead to a new position. Note that after a record, the progress bar represents the actual recorded duration, not the maximum duration. Right-Click on the play button or on the progress bar to reset the playhead to the beginning of the recording.
- Record Button: Press this button to start a recording. The recording always starts from the beginning. The progress bar will show the percentage recorded relative to the maximum duration. The recording will stop when the Play or Record button is pressed, or when the playhead reaches the end of the memory (unless the Loop button is enabled, in which case it will cycle and overwrite).
- Save… (Full View only): Press this button to save the recording into a file.
- Show Folder… (Full View only): After a recording has been saved, press this button to view the file in its folder.
- Change View Button (Down or Up arrow): Press this button to toggle between the Full and Compact views.
Audio and Midi data Snapshots
While practicing a song or in a live performance, it is possible to save a snapshot (audio and MIDI data) of the songs (all record loops). This can be useful for further recall of the performance or for creating the best take for error recovery (see next section). When a Snapshot is created, all audio and Midi data are put in a newly created Song’s sub-folder. The name of the sub-folder will be SS_ followed by the date (Year_month_day__hour_min_sec). Note that a snapshot does not save the loops position and size but only the audio and Midi data. Hence, it is recommended to use snapshots when a song is set up (all the loops are in place). Note: since Release 1.15.0, a copy of the xml song file is save in the same folder than the Snapshot. Its purpose is to be able to reload a snapshot even if the song has been modified. If this file is open and you want to save it, you will be asked to provide a new name to avoid « corrupting » the snapshot.
There are two ways to create a snapshot:
- Using menu: Tracks/Save Snapshot (Audio and MIDI data)
- Using shortcut: CTRL-Shift-S (as all shortcuts, this shortcut can be assigned to another key sequence or MIDI learn)
To load a Snapshot:
- Using menu: Tracks/Load Snapshot (Audio and MIDI data). Note that you can use this menu to load a standard Snapshot, a Best Take Snapshot (Best Take) or the data from the last time the song was saved (Records).
Best Take Snapshot (cheat features)
Best Take Snapshot is a specific type of snapshot (see the previous section). When created, the only difference is that a « Best Take » snapshot is saved in a designated « Best Take » folder. There can only be one best take for a loop. The purpose of a best take is to allow its use for Play loops (or Record loops) after a mistake during a live performance. When a Best Take exists for a Record loop, a gray line will appear at the bottom of the loop. If the Best Take is used (by calling a cheat mode shortcut after a mistake), the line will be shown for both the record loop and the play loops linked to it. The color of the lines will match the color of the loops.
There are two ways to create a Best Take Snapshot:
- Using menu: Tracks/Save « Best Take » Snapshot (Audio and MIDI data)
- Using menu: Loops and markers/Save « Best Take » Snapshot for selected loops
To load back a Best Take Snapshot:
- Using menu: Tracks/Load Snapshot (Audio and MIDI data). Choose « Best Take » folder
- Using menu: Loops and markers/Load « Best Take » Snapshot for selected loops
There are three (3) ways to recover from an error using while playing (the first one is recommended because it is more targeted but the other ways are more permissive):
- [changeRecordLoop] CTRL-Shift-A: Small cheat – The Best Take audio and/or MIDI data will be used for all play loops linked to record loops that intersected the playhead when the shortcut was pressed. This shortcut must be called before the end of the record loop where the mistake occurred. Optionally, a user can press a number (changeRecordLoop) before calling the shortcut. If this number is different from 0, the record loops that intersected the playhead will be loaded with their corresponding best take and temporarily locked. These record loops will be played instead of the live performance (or with the live performance depending on the monitoring mode).
- [changeRecordLoop] CTRL-Shift-C: Medium cheat – The Best Take audio and/or MIDI data will be used for all play loops linked to record loops that ended before the playhead when the shortcut was pressed. This shortcut can be called after the end of the record loops where the mistake occurred. Optionally, a user can press a number (changeRecordLoop) before calling the shortcut. If this number is different from 0, the record loops that ended before the playhead will be loaded with their corresponding best take and temporarily locked. For this cheat, the impact will be mostly visual unless there is a backward jump in the song.
- [changeRecordLoop] CTRL-Shift-B: Big cheat – The Best Take audio and/or MIDI data will be used for all play loops linked to record loops that started before the playhead when the shortcut was pressed. This shortcut can be called after or before the end of the record loop where the mistake occurred. Optionally, a user can press a number (changeRecordLoop) before calling the shortcut. If this number is different from 0, the record loops that started before the playhead will be loaded with their corresponding best take and temporarily locked. These record loops will be played instead of the live performance (or with the live performance depending on the monitoring mode).
Note 1: Pressing a number before calling one of the shortcut is not very practical. This option is meant to be used with script and linked to a midi event. Here is an example of what the script might looked like:
setUserArgs 1               // 1 = record loops will be impacted
shortcut "Ctrl+Shift+A"     // call "Small cheat" shortcut
Note 2: The « alphabetic » order of the shortcuts may seem counterintuitive, as CTRL-Shift-B triggers a more substantial cheat than CTRL-Shift-C. This is due to backward compatibility, since the Medium Cheat was added after the other cheat shortcuts. Users can invert these shortcuts if desired. However, again, these shortcuts are primarily intended to be assigned to MIDI events (such as a pedal or controller) rather than being used directly as keyboard shortcuts.
Song chords editor
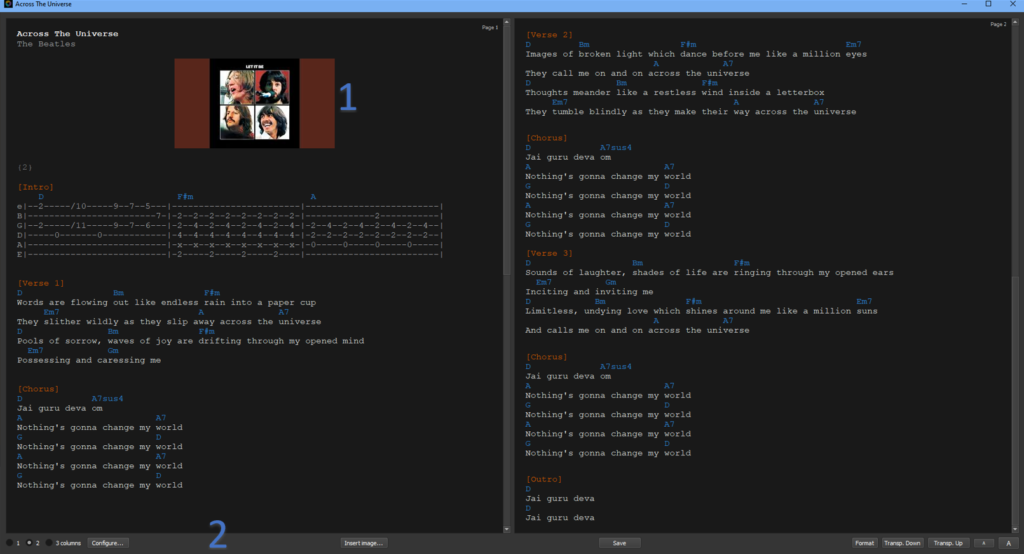
The chords editor allows the user to provide lyrics and chords to be displayed in the Looper view. Basically each line must be set to a certain type before the song can be displayed correctly in the Looper view. Usually, the format button can to this automatically except for the Title and the Author. If the format button failed to recognize a line properly, each line can be configured manually with a right-click. Here are the different line categories:
- Title: Will be shown above the Looper View
- Author: Will be shown above the Looper View
- Chords: will shown in blue in the Looper View if Lyrics and chords are set to be shown (View/Lyrics and chords)
- Lyrics: will be shown in white in the Looper View if Lyrics and chords are set to be shown (View/Lyrics and chords)
- Comment: if the comment is between two square brackets [ ], it will be shown as a marker in the Looper view if Show Song Sections is checked in the Chords Configure Dialog. This marker can be moved to a different bar. The tag {barValue} will be added just before the comment (inside the bracket).
- Tab: won’t be shown in the Looper View
- Bar: if a line contains a bar value between to curly brackets { }, if will set the song to this bar value. This category cannot be selected with the right-click menu, only with the format button.
- Section 1: Song chords and lyrics editor. This section can be split into two or three sections to allow the user to see all the song’s lyrics in a convenient way.
- Right-click: the right-click menu allows the user to set a line to different tags: Title, Author, Chord, Lyrics, Comment or Tablature. If the mouse is over a chord line, there will also be an option to set the song tick at the position of the chord located at the left of the mouse. Note: the comment between brackets will be shown on the looper view if the « Show Song sections in Looper View » checkbox is checked in the configure dialog.
- Section 2:
- 1 2 3 columns: Split Section 1 in 1, 2 or 3 parts
- Configure…: Show the configuration dialog for the song. See Chords configuration examples below.
- First chord position: Set the position of the first chord in bar
- Text scale factor: Scale the text for display in the looper view. This is sometimes necessary to lower this value when there is a lot of lyrics between chords so the words don’t overlap. On the other end, if there are few words between chords, increasing this value might help seeing the words.
- Between chords: Number of bars between chords (default distance). It is recommended to set this value so that it fits most of the song and adjust the particular cases with variations.
- Variation 1 to 6: Symbols used in the song to adjust the distance between to chords when it is not the same as the default distance. For example, a symbol set at 0.5 bar and positioned between two chords will distance the two chords by 1 bar. Symbols can be added up. For example, two 0.3333 symbols will create a distance of 0.6666 between chords. Symbols are also useful to set the position of a particular word. You can use the symbol you want to fit your personal taste. Symbols can be made of one or many characters. Avoid chord names as symbols unless you want bizarre results! Check the « Chords configuration » section for more details
- Insert image…: Insert an image in the viewer. The images will be centered. It is possible to show many images on the same line. Images are useful to keep music sheet with a song or to add a thumbnail. After inserting an image, you can right-click on the image to set its size
- Save: will save the song (same as Files/Save or CTRL-S on the main window)
- Format: will try to automatically format the song (detect Chords, Lyrics and Comments). It may fail for some lines that are difficult to discriminate between Chords and Lyrics. For these lines, simply right-click on the line to choose the appropriate tag.
- Transp. Down/Transp. Up: Transpose the song one half-step down or up
- A (small) / A ( large): decrease or increase the font size
Chords configuration
The Chords configuration dialog is used to accurately position chords and lyrics in the looper view. Basically, a default distance between chords is used (« Between chords » value) and « Variation symbols » are used for variation in the song.
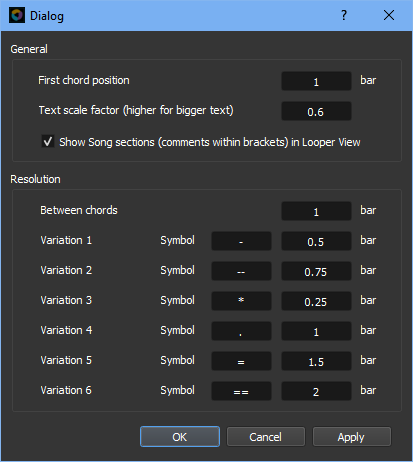
- First chord position: The first chord of the song will be shown at this bar value
- Text scale factor: The lyrics font will be scaled by this factor in the Looper view. If a song has many words per bar (or between chords), this parameter should be set to a low value otherwise, words could overlap.
- Show Song sections: If checked, the comments that are within brackets will be shown in the Looper view. Example: [Intro], [Verse], [Chorus], etc.
- Between chords: default distance between two consecutive chords in bar
- Variation x: See details below
Variation symbols are also very powerful to accurately position lyrics. For all the examples below, the following configuration is used.
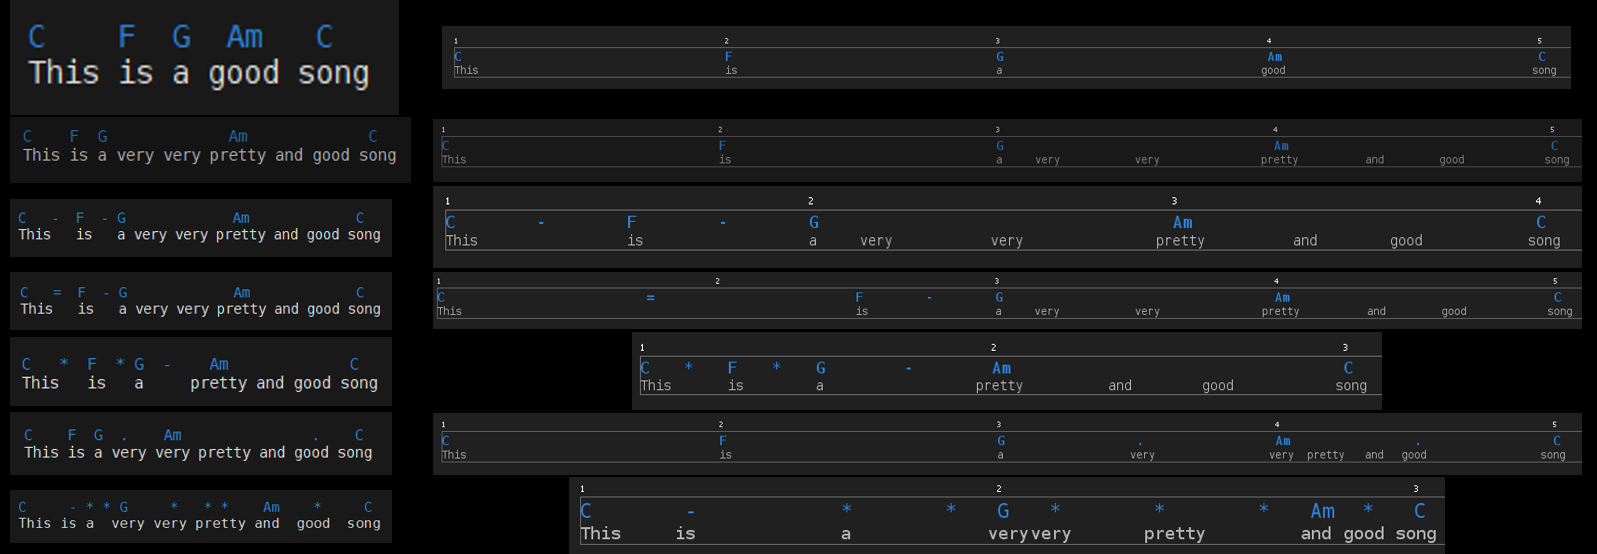
Automation
Automation is the process of changing a parameter value over time during record or playback (for example, adjusting volume, filter cutoff, or effect parameters). In LoopToGo, automation is created using curves inside dedicated Automation Loops. These curves define how a parameter evolves across a loop.
An Automation Loop can be added to an existing audio or MIDI track or to a dedicated track. Each curve in an Automation Loop controls a single parameter. The parameter does not need to be related to the track where the Automation Loop is located.
Creating Automation Loops and Curves
Say we have a Voice track with a reverb plugin and we want to automatically change the reverb mix value over a few bars.
Make sure the Looper View tab is selected. Press the Automation button on the left panel (yellow arrow) or press X. Then draw a loop on a track (it can be on any track). The loop will be shown in yellow. This color can be changed in Preferences/Color.
To add a curve, right-click on the Automation Loop and select « Add Automation… ». The following dialog will be shown:

Choose a name for the curve by clicking the Rename button. Let’s call it « Voice Reverb ». Then select the Mix parameter for the reverb plugin in the tree view.

As soon as a parameter is selected, the OK and Apply buttons are enabled, allowing you to create the curve associated with that parameter. The curve is initialized with two points (start and end), both set to the current parameter value.
A baseline value is also created using the current value. This baseline represents the value used whenever the parameter is not controlled by any Automation Curve (outside all Automation loops with a curve associated with this parameter). Each parameter has a single baseline value shared across all curves that control it. Changing the baseline value in one curve will affect all curves controlling that same parameter.
Here is how the dialog looks after pressing Apply (or when reopening it for an existing curve):

When a curve exists, the baseline value is displayed along with a table listing all points in the curve. You can edit both the baseline and the points in this table. While the table is useful for precise edits, curves are usually easier to modify using the mouse or Capture mode.
Editing an Automation Curve with the mouse
Close the Automation Settings dialog if it is open by clicking OK. Right-click on the curve and select « Edit Automation Directly ». The loop and curve will change color, and the loop will slowly flash to indicate that it is in editing mode.

To add or modify points, draw directly on the curve while holding the left mouse button. You can also click to create or move points. Clicking an existing point turns it red; press Delete to remove it.
Hold Shift while clicking to select multiple points. You can also drag a selection rectangle (starting outside the curve) to select several points at once.
The first and last points cannot be deleted. If you attempt to remove them, a menu will allow you to reset their value to the baseline or keep their current value (only shown if the value differs from the baseline).
When you are done editing, press Esc or right-click the loop and select « Edit Automation Directly ».

Editing an Automation Curve in Capture mode
Capture mode allows you to record parameter changes in real time while the song is playing. It also works during recording, although this is not recommended.
To enter Capture mode, first enable editing mode, then press X. Position the playhead before the Automation Loop (or wherever you want to start capturing), then press play.
While the song is playing, adjust the parameter using its graphical control (knob, slider) or, preferably, with a MIDI controller mapped to that parameter (MIDI learn). The curve will be updated in real time based on your movements.
Note that while in Capture mode, the parameter is no longer controlled by the existing curve. It is also possible to capture a single point while the song is stopped.
Resizing an Automation Loop
When dragging the start or end of the loop to resize it, the curve is stretched proportionally. This is the default behavior.
However, holding the SHIFT key while resizing shows three options:
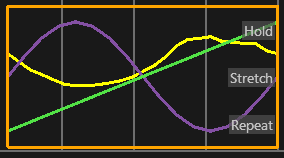
- Hold, where the last values are extended
- Stretch, which is the default behavior
- and Repeat, where the curve is repeated from the start

Again, the points are created according to the current snap setting.
These methods can also be applied to the beginning of the loop.
Markers
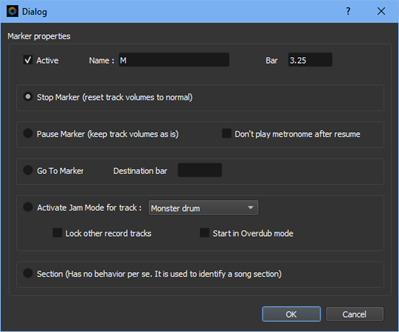
Markers are used to automate different actions while the song is playing or recording. To add a Marker, click above the timescale in the Looper view. A Stop Marker (orange square) will be added and the properties dialog window will be shown so you can select the type of markers and change its properties. You an also create a specific Marker by right-clicking on an empty spot on the marker section. A drop down menu will display the different types of Marker.
If you just want to create a Stop Marker without showing the properties window, simply hold Shift while clicking. To change the properties of an exiting Marker, double-click on the Marker or right-click on the Marker and select Properties. To move a Marker, simply drag it to its new position. To delete a Marker, right-click on it and select Delete Marker. To show superposed markers, simply bring the mouse pointer over the markers to vertically with their order of priority.
Other ways to add markers:
- CTRL-G: Add a GoTo Marker « around » the selected loop (or loops)
- CTRL-J: Add a Jam Marker at the beginning of the selected loop
- CTRL-K: Add a Section Marker at the Song bar if the song is stopped and at the Song Start bar if the song is playing or recording. A Properties dialog window will immediately be shown to choose the name of the Marker or to change its type and properties.
Here is the different Marker types:
- Stop (Red): The song will stop at the Marker. Note that all the chain’s volume will be reset to their defaults. If the Marker is set at the end of a loop with a fader, the volume will be set to normal and the sound will resume if any effects are still being produce by the plugins. To avoid this behavior, set the Stop Markers one bar (or more) passed the end of the song. Another way to avoid the volume increase is to use a Pause Marker.
- Pause (Yellow): The song will stop at the Marker. Chain’s volume won’t be reset if any. After a pause, no pre-record or pre-play metronome will be used.
- Goto (Blue): The song stick will be changed to a new value. The destination bar will be shown by a small square with a line between the start bar (regular square) and the destination bar (small square). The new value can be changed in the Properties dialog (right-click on the Marker to access the properties Dialog) or by dragging the destination square. Goto markers can be toggled with G shortcut.
- Start Jam Mode (Purple): While recording, the Jam Mode will be enabled for the record loop in the track associated with the marker. The track associated with the marker has to be specified in the properties dialog (right-click on the Marker to access the properties Dialog). You can also choose to start the jam mode for the Selected track or the first empty loop which can be very useful when jumping from section to sections.
- Lock other record tracks: if checked, loops in other tracks will be locked if the overlap (in time) with the jam track. The locking happens as soon as the recording starts.
- Start in overdub mode: if checked the Jam mode will start in Overdub mode (instead of Record mode)
- Section (Orange): Use to identify sections of the song. The name of the marker will be written beside the marker. Comments in brackets added in the chords editor are also shown as Section Markers but these auto-generated markers cannot be edited with a loop properties menu. They have to be edited within the chords editor. If you right-click on a section markers or in a Section row in the structure view (CTRL-U), it is possible to select all the loops in a section
- Internal markers (Green): Jam mode will create some markers to show where the loop will take place or end. These markers are green and cannot be edited by the user.
Scripting Language
LoopToGo 2.0 supports a very powerful scripting language that can be used to to improve LoopToGo song editing workflow or live performance.
A script is a text file with a list of commands that can be associated with a Script Marker, a keyboard shortcut, a MIDI event or a button. The script can be used to create functionality that are not natively designed in LoopToGo or to combine many of native shortcuts. It is very powerful to create dynamic song templates or to customize the looper behavior. Script files have the .ltgs or .txt extension.
Note: the script maximal length (number of commands) allowed depends on the license that you purchased. The Pro license has not maximal length. See the Website Buy section for more details.
Warning: Scripts are to be used by LoopToGo advanced users. We suggest that you get familiar with LoopToGo before using scripts. Also, scripts can be very demanding in CPU and or memory when not used properly. Never use a script in a live performance if the script has not been thoroughly tested before.
There are many ways to execute script in LoopToGo:
Button: You can create a Script Button that will execute a script when pressed. The button will be added to the Script Button Panel (located at the left of the Looper View) and to the Script Button Window. You can select to individually show or hide the Script Button Panel and the Script Button Window in the View Menu. Contrary to the other way to execute a script (Marker and Event), a script associated with a button will be loaded each time the button is pressed.
Script Marker: The commands are executed when the song tick reach a Script Marker while the song is playing or recording. To create a Script Markers, create a Marker (see the help page) and check Script Marker then choose a script file and, optionally, add arguments that will be passed to the script. Alternatively, you can use the Manage Scripts Dialog Window to create a Script Marker. Note that for Script Markers, the list of commands is loaded in memory when the script is associated to the marker. If you edit the script file, you have to reload the script in memory (Scripts/Reload all scripts or edit the marker). For this reason, it could be more efficient to use the Manage Scripts Dialog Window to develop and test the script before associate it to a Script Marker.
Keyboard shortcut or MIDI event: The commands are executed when the event occurs. To associate a script with an event, use the « Scripts/Link Script to MIDI or keyboard event » menu. . Alternatively, you can use the Manage Scripts Dialog Window. Note that for Keyboard shortcuts or MIDI events, the list of commands is loaded in memory when the script is associated to an event. If you edit the script file, you have to reload the script in memory (Scripts/Reload all scripts or edit the event with Scripts/Manage scripts). For this reason, it could be more efficient to use the Manage Scripts Dialog Window to develop and test the script before associate it to a shortcut or MIDI event.
Note: It is suggested to use the ALT modifier to assign script to keyboard shortcut (Example ALT-L). As a matter of fact, LoopToGo default shortcut are assigned to CTRL and SHIFT modifiers and not ALT modifier. The only exception are ALT-1, ALT-2, etc. which are used for muting and unmuting tracks and ALT-Right and ALT-Left. If you still prefer to use a CTRL or SHIFT modifier, make sure to unassigned the default shortcut.
Other ways (see the Scripting language documentation for more details):
- Automatically starting a script when LoopToGo starts
- Automatically starting a script when LoopToGo exits
- Automatically starting a script when a song is loaded
- Automatically starting a script when a song is closed
- Automatically starting a script when entering a loop
- Automatically starting a script when exiting a loop
Script Language Syntax
Click here for the Scripting language documentation
List of commands
Click here for t list of all script Commands
System Variables
Click here for a list of all System Variables
Script Examples
Click here for some Script Examples
Interfaces
Interfaces are a powerful feature to extend and customize the user experience. An Interface is a QML-based graphical window that can be used to interact with LoopToGo through shortcuts, scripts, and system variables. LoopToGo comes with « Factory » Interfaces that serve as examples. Users can adapt these Interfaces or create their own to suit their specific needs. The possibilities are endless.
Interfaces can be launched through the Interface Browser (Interfaces > Show Interface Browser) or by using the script commands launchQmlInterface or launchFactoryQmlInterface.
For more details about using or developing Interfaces, please refer to this page: Interfaces Documentation
OSC Protocol
LoopToGo supports the Open Sound Control (OSC) protocol, enabling enhanced interoperability with other music software and hardware. This feature includes both server and client functionalities, opening up new possibilities for remote control and automation.
Setting Up OSC Connections
- Navigate to Preferences: Go to
Preferences > OSC > Add new... - Create Connections: Create at least one OSC connection before using any OSC functionalities. You can create multiple connections as needed.
Debugging
- Enable Debugging: Go to
Preferences > OSCand check « Show communication info ». - View the Log Console: Navigate to
View > Show Error/Log consoleto view logs.
LoopToGo as an OSC Server
Control LoopToGo remotely using OSC messages. Key features include:
Widget Control
- General Control: Most main window UI widgets and Track specific widgets can be controlled via OSC. Hover over a button or slider to see its OSC addresses in the tooltip. When the « Show messages in Error/Log Console » checkbox is checked (in Preferences/OSC), the OSC addresses are print in the Error/Log console when the widget tooltip is shown (hovering over a widget). This is useful to copy addresses.
- Examples:
- Mute button:
/buttonClick/muteand/buttonState/mute 1 - Main volume slider:
/slider/mainVolume .5or/slider/mainVolume db -1.5 - Chain-specific controls (note that when using Chain’s name, you must replace any space by the underscore symbol):
- /chain/[number]/[control] (e.g., /chain/3/slider/volume db 1.5, /chain/1/slider/pan)
/track/[chain_name]/[control](e.g.,/track/Guitar_clean/slider/volume db 1.5,/track/Voice/slider/pan)
- Mute button:
Script Commands via OSC
- Access Commands: Add
/scriptbefore the command name (e.g.,/script/setTempo 100). Note, the OSC adress can have multiple levels as long as the « script » tag is second-to-last. For example, the following adress will also work: /main/script/settempo, /level1/203/script/setTempo. This can be useful to pass values to the script through the OSC address. As a matter of fact when starting a script from an OSC client, the following system variables are set:- $oscFullAddress: the OSC full address
- $oscNbLevels: the number of levels in the OSC address
- $oscLevel1, $oscLevel2, etc: the OSC levels
- Reply Addresses: For commands that set variables, provide an OSC address for the reply (e.g.,
/script/getTempo /myDisplay/setTempo). In this example, LoopToGo will send back/myDisplay/setTempoaddress to the OSC client with the tempo value. - Multiple Variable Commands: Use commands like
/script/getBankInfo /myDaw/currentBank /myDaw/nbOfTracksPerBanks.
For more detailed information on available script commands, please refer to our scripting language documentation.
Script Buttons Custom OSC Addresses
- Add Custom Addresses: Assign custom OSC addresses to script buttons for greater flexibility. This is done by filling the OSC Address, in the Script Button Dialog. After closing the dialog, the entire OSC address will be shown in the script button tooltip (keeping the mouse still above the button). For the example below, the whole OSC address would be: /scriptWidget/myTest
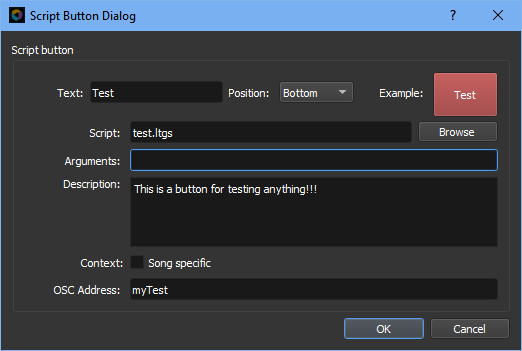
LoopToGo as an OSC Client
For now, LoopToGo can be used as an OSC client only inside a script. As scripts could introduce a delay (~5ms), this might not be suitable for real-time application.
Send OSC messages from LoopToGo to other applications using scripts:
- Create an OSC Connection:
createOscConnection osc2 192.168.2.227 3821 8000 - Send OSC Messages:
sendOscMessage osc2 "/transport_play" 1 - Specify Argument Types (optional):
sendOscMessage osc1 "/test" 2 int 3 float test string 4.2 "It's a test"
Note: There might be a slight delay (5ms or more) when using scripts to send OSC messages.
Advanced Features
- Message Filtering: Options are available in the
Preferences > OSCdialog, for fine-tuning OSC communication. - Automatic Saving: OSC connections are automatically saved and reloaded when LoopToGo exits and starts.
Compatibility
LoopToGo’s OSC implementation has been tested with TouchOSC and Open Stage Control. It should be compatible with other OSC-capable software like Gig Performer, though specific integrations may require additional setup.
We welcome your feedback on the OSC implementation. If you encounter any issues or have suggestions for improvement, please let us know.