Introduction
Welcome to the comprehensive guide for using and building Interfaces in LoopToGo. This document is designed to help you navigate the graphical interface system written in QML, understand its integration with scripts and shortcuts, and even create your own custom interfaces. Whether you are using the pre-built examples or developing a unique interface tailored to your workflow, this guide has you covered.
Overview
LoopToGo’s Interfaces are dynamic graphical windows constructed in QML. They act as the graphical means to interact with LoopToGo’s scripting, shortcuts, and system variables. Two principal categories define the Interfaces:
- Factory Interfaces: Pre-built examples provided by LoopToGo. Some are fully functional for regular use, while others are meant to showcase the possibilities available.
- My Interfaces: Custom interfaces created or copied from Factory Interfaces by the user. This folder starts empty upon your initial installation, inviting you to customize your experience.
Using Factory Interfaces
Accessing the Interface Browser
To get started, open the Interface Browser by selecting: Interfaces > Show Interface Browser…. (or Ctrl+ /).This will launch a dedicated dialog window where all available interfaces are displayed.
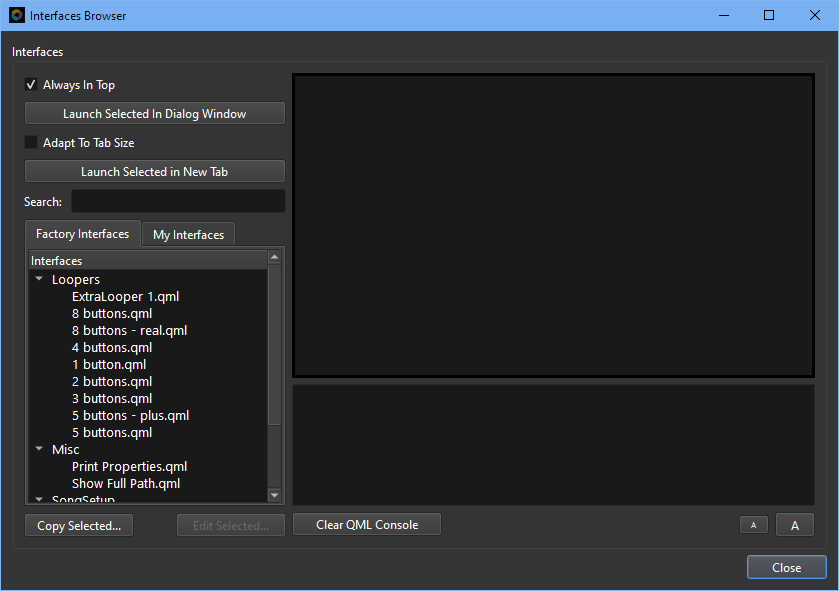
In the Interface Browser, you will find the interfaces organized by category and divided into two tabs:
- Factory: Displays the default examples provided by LoopToGo.
- My Interfaces: Contains your personal interfaces. (Initially, this tab will be empty.)
Note: Editing Factory Interfaces directly is not recommended, as they will be overwritten in future software updates. To modify an existing Factory Interface, use the « Copy Selected… » button to duplicate it into the My Interfaces folder.
Previewing and Launching Interfaces
A single click on an interface will display a static preview in the browser’s preview panel (this preview is not fully interactive). To fully launch an interface:
- Double-click the interface.
- Or use either of the following launch buttons:
- Launch Selected in Dialog Window: Opens the interface in its own window. If the « Always On Top » option is enabled, the window remains above others. Once the Interface is launched, you still can change this option and also adjust the window opacity via a right-click on the header.
- Launch Selected in New Tab: Displays the interface within a new tab of the LoopToGo main window. When the « Adapt To Tab Size » option is checked, the interface scales to fit the tab dimensions; otherwise, it adheres to its defined QML size.
Interaction and Tooltips
- When you hover over a button in the Interface, a tooltip will appear describing its function.
- Interface widgets, such as buttons, sliders, and indicators, can trigger scripts or shortcuts. These elements interact with LoopToGo by accessing system variables and executing commands.
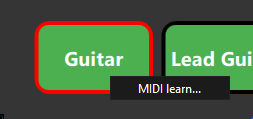
- A right-click on a button allows you to set up a MIDI Learn assignment, linking the button to a MIDI controller action.
MIDI Learn Management
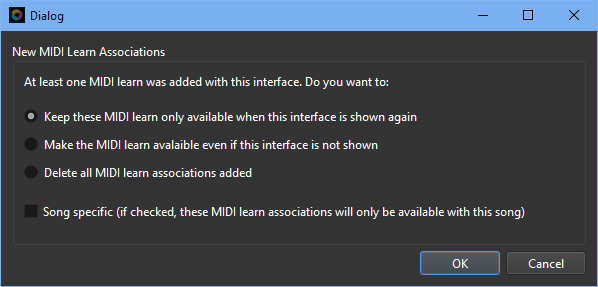
When you exit an interface that has new MIDI associations, LoopToGo displays a dialog with the following options:
- Keep these MIDI learns only available when this interface is shown: (Recommended for beginners)
- Make the MIDI learns globally available: The assignments remain active even if the interface is closed.
- Delete all MIDI learn associations added: Removes all current MIDI mappings for the interface.
A « Song Specific » checkbox further refines these settings, making the MIDI associations valid only for the current song. These configurations can later be modified in the Script Manager (for script-based MIDI commands) or under Files > Preferences > Shortcuts (for shortcut-based MIDI commands).
Building Your Own Interface
Introduction to Custom Interfaces
While LoopToGo’s Factory Interfaces provide a robust starting point, creating your own interface allows you to personalize functionality to your exact needs. Basic QML knowledge is recommended for simple interfaces, while more advanced projects might also require an understanding of LoopToGo’s scripting language.
A popular approach for beginners is to start by copying a Factory Interface and then gradually adapting it. Below is a step-by-step tutorial illustrating how to create a straightforward simple Interface from scratch.
Step 1: Create the QML File
Using your favorite text editor, create a new file and save it as:
{User Documents}/LoopToGo/Interfaces/Simple Example.qml
Step 2: Write Your Basic QML Code
Enter the following code to define a simple Play button:
import QtQuick 6.5
import QtQuick.Controls 6.5

Item {
    width: 300
    height: 150

    Button {
        width: parent.width / 2
        height: parent.height / 2
        text: "Play"
        anchors.centerIn: parent
        palette {
            buttonText: "green"  // Sets the text color to green
        }
        onClicked: console.log("Play")
    }
}
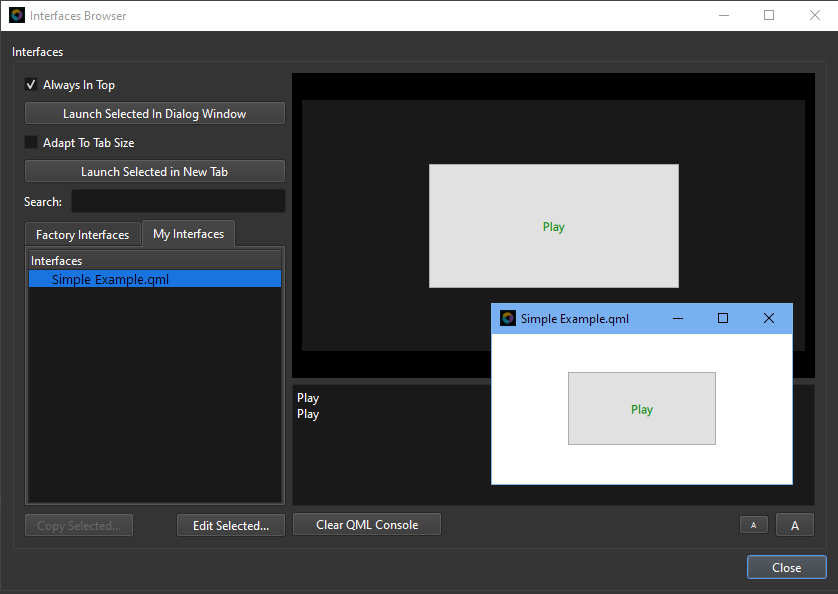
When you save this file, it will appear on the My Interfaces tab in the Interface Browser (note, to refresh the list, click on the « Factory » tab and click back on the « My Interfaces » tab). Double-clicking the interface will launch it, and you’ll see a “Play” message logged in the browser’s log section. If there are any errors (such as incorrect syntax), they will also be shown in the log section with a corresponding line number.
Step 3: Adding Interactive Functionality
To allow your interface to communicate with LoopToGo (for example, to trigger a shortcut or launch a script), enhance your QML file by adding an execution signal. Insert the following line at the beginning of your Item:
signal ltgExecute(ltgType: string, ltgAction: string, ltgParameters: string)
Then, modify the onClicked handler to invoke this signal:
onClicked: {
    console.log("Play")
    ltgExecute("shortcut", "shortcut", "Space")  // Calls the 'Play' shortcut
}
The whole file should now look like this:
import QtQuick 6.5
import QtQuick.Controls 6.5

Item {
    width: 300
    height: 150

    signal ltgExecute(ltgType: string, ltgAction: string, ltgParameters: string)

    Button {
        width: parent.width / 2
        height: parent.height / 2
        text: "Play"
        anchors.centerIn: parent
        palette {
            buttonText: "green"  // Sets the text color to green
        }

	onClicked: {
	    console.log("Play")
	    ltgExecute("shortcut", "shortcut", "Space")  // Calls the 'Play' shortcut
	}
    }
}
Note: Make sure to launch the interface by double-clicking it, as the ltgExecute signal is not processed when using the preview window. Clicking the Play button should cause the playhead to start moving.
Tip: To refresh the interface preview, click on the QML file name again.
Step 4: Expanding with Multiple Buttons and Layouts
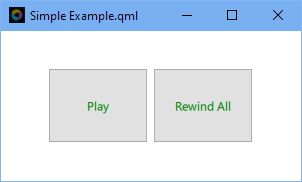
Suppose you want to add additional functionality, such as a “Rewind All” button. You can arrange multiple buttons side by side using a RowLayout. The following example shows how to create a dual-button interface:
import QtQuick 6.5
import QtQuick.Controls 6.5
import QtQuick.Layouts 1.15

Item {
    id: mainItem
    width: 300
    height: 150

    signal ltgExecute(ltgType: string, ltgAction: string, ltgParameters: string)

    RowLayout {
        anchors.centerIn: parent

        Button {
            Layout.preferredWidth: mainItem.width / 3
            Layout.preferredHeight: mainItem.height / 2
            text: "Play"
            palette { buttonText: "green" }
            onClicked: {
                console.log("Play")
                ltgExecute("shortcut", "shortcut", "Space")
            }
        }

        Button {
            Layout.preferredWidth: mainItem.width / 3
            Layout.preferredHeight: mainItem.height / 2
            text: "Rewind All"
            palette { buttonText: "green" }
            onClicked: {
                console.log("Rewind All")
                ltgExecute("shortcut", "shortcutByID", "-1000")
            }
        }
    }
}
Note: For the Rewind All button, we used the « shortcutByID » action to show a different approach.
The Interface should now look like this and the Rewind All button should stop the playhead and move it at bar 1:
Step 5: Utilizing LoopToGo Widgets
LoopToGo offers specialized widgets to streamline interface design. By importing LtgWidgets, you can substitute standard buttons with enhanced LtgButton components. Add the following line at the beginning of your file (with the other import lines):
import LtgWidgets 1.0
Replace your button definitions with the following:
LtgButton {
    Layout.preferredWidth: mainItem.width / 3
    Layout.preferredHeight: mainItem.height / 2
    text: "Play"
    ltgType: "shortcut"
    ltgAction: "shortcut"
    ltgParameters: "Space"
}

LtgButton {
    Layout.preferredWidth: mainItem.width / 3
    Layout.preferredHeight: mainItem.height / 2
    text: "Rewind All"
    ltgType: "shortcut"
    ltgAction: "shortcutByID"
    ltgParameters: "-1000"
}
Your Interface file should look like this:
import QtQuick 6.5
import QtQuick.Controls 6.5
import QtQuick.Layouts 1.15

import LtgWidgets 1.0


Item {
    id: mainItem
    width: 300
    height: 150

    signal ltgExecute(ltgType: string, ltgAction: string, ltgParameters: string)

    RowLayout {
        anchors.centerIn: parent

        LtgButton {
	    Layout.preferredWidth: mainItem.width / 3
	    Layout.preferredHeight: mainItem.height / 2
	    text: "Play"
	    ltgType: "shortcut"
	    ltgAction: "shortcut"
	    ltgParameters: "Space"
	}

	LtgButton {
	    Layout.preferredWidth: mainItem.width / 3
	    Layout.preferredHeight: mainItem.height / 2
	    text: "Rewind All"
	    ltgType: "shortcut"
	    ltgAction: "shortcutByID"
	    ltgParameters: "-1000"
	}
    }
}
By using the ltgButton widget, not only is it easier to set up shortcut or script calls, but the button also includes a tooltip (on mouse-over) that shows exactly what the button does. In addition, it provides access to a context menu (on right-click) to easily add MIDI-learn functionality to your interface.


Step 6 – Using system variables from LoopToGo
The Interfaces can use any LoopToGo system variables (and user defined global variables) to enhance the user experience. These system variables are the same used in scripts and are listed in LoopToGo Scripting language documentation. To demonstrate this feature, let us first add a title to our Simple Example Interface. Add the following section just after the signal definition:
Text {
	text: "Simple looper"
	color: "green"

	horizontalAlignment: Text.AlignHCenter  // Ensures text alignment inside the box
	anchors.horizontalCenter: parent.horizontalCenter  // Centers the text horizontally
	anchors.top: parent.top
	anchors.margins: mainItem.height*.04

	font.pixelSize: mainItem.width * 0.05
}
The whole file should look like this:
import QtQuick 6.5
import QtQuick.Controls 6.5
import QtQuick.Layouts 1.15

import LtgWidgets 1.0


Item {
    id: mainItem
    width: 300
    height: 150

    signal ltgExecute(ltgType: string, ltgAction: string, ltgParameters: string)

    Text {
        text: "Simple looper"
        color: "green"

        horizontalAlignment: Text.AlignHCenter  // Ensures text alignment inside the box
        anchors.horizontalCenter: parent.horizontalCenter  // Centers the text horizontally
        anchors.top: parent.top
        anchors.margins: mainItem.height*.04

        font.pixelSize: mainItem.width * 0.05
    }

    RowLayout {
        anchors.centerIn: parent

        LtgButton {
        Layout.preferredWidth: mainItem.width / 3
        Layout.preferredHeight: mainItem.height / 2
        text: "Play"
        ltgType: "shortcut"
        ltgAction: "shortcut"
        ltgParameters: "Space"
        }

        LtgButton {
            Layout.preferredWidth: mainItem.width / 3
            Layout.preferredHeight: mainItem.height / 2
            text: "Rewind All"
            ltgType: "shortcut"
            ltgAction: "shortcutByID"
            ltgParameters: "-1000"
        }
    }
}
The Interface now display a Title:

Let say that we would like this Title to be the name of the song. First we have to inform LoopToGo that the Interface will use the songName system variable by adding this code after the signal definition:
Component.onCompleted: {
        loopToGo.registerProperty("songName", "string");
    }
Note that we must embed it within Component.onCompleted because the variable registration must be done when the Interface has finished loading.
Then, to use the variable we use the following reference in our QML file:
loopToGo.properties["songName"]The file should look like this:
import QtQuick 6.5
import QtQuick.Controls 6.5
import QtQuick.Layouts 1.15

import LtgWidgets 1.0


Item {
    id: mainItem
    width: 300
    height: 150

    signal ltgExecute(ltgType: string, ltgAction: string, ltgParameters: string)

    Component.onCompleted: {
        loopToGo.registerProperty("songName", "string");
    }

    Text {
        text: loopToGo.properties["songName"]
        color: "green"

        horizontalAlignment: Text.AlignHCenter  // Ensures text alignment inside the box
        anchors.horizontalCenter: parent.horizontalCenter  // Centers the text horizontally
        anchors.top: parent.top
        anchors.margins: mainItem.height*.04

        font.pixelSize: mainItem.width * 0.05
    }

    RowLayout {
        anchors.centerIn: parent

        LtgButton {
        Layout.preferredWidth: mainItem.width / 3
        Layout.preferredHeight: mainItem.height / 2
        text: "Play"
        ltgType: "shortcut"
        ltgAction: "shortcut"
        ltgParameters: "Space"
        }

        LtgButton {
            Layout.preferredWidth: mainItem.width / 3
            Layout.preferredHeight: mainItem.height / 2
            text: "Rewind All"
            ltgType: "shortcut"
            ltgAction: "shortcutByID"
            ltgParameters: "-1000"
        }
    }
}
The song title will now appears (given a song has been saved). We can test if the variable is empty or not and change the title accordingly:
text: loopToGo.properties["songName"] == "" ?
    "Simple Example" :
    loopToGo.properties["songName"]
In this final example, we also set the color of the play button is the song is playing or recording:
import QtQuick 6.5
import QtQuick.Controls 6.5
import QtQuick.Layouts 1.15

import LtgWidgets 1.0


Item {
    id: mainItem
    width: 300
    height: 150

    signal ltgExecute(ltgType: string, ltgAction: string, ltgParameters: string)

    Component.onCompleted: {
        loopToGo.registerProperty("songName", "string");
        loopToGo.registerProperty("isPlaying", "bool");
        loopToGo.registerProperty("isRecording", "bool");
        loopToGo.registerProperty("isPaused", "bool");
    }

    Text {
        text: loopToGo.properties["songName"] &&
            loopToGo.properties["songName"] != "" ?
            loopToGo.properties["songName"] :
            "Simple Example"
        color: "green"

        horizontalAlignment: Text.AlignHCenter  // Ensures text alignment inside the box
        anchors.horizontalCenter: parent.horizontalCenter  // Centers the text horizontally
        anchors.top: parent.top
        anchors.margins: mainItem.height*.04

        font.pixelSize: mainItem.width * 0.05
    }

    RowLayout {
        anchors.centerIn: parent

        LtgButton {
            Layout.preferredWidth: mainItem.width / 3
            Layout.preferredHeight: mainItem.height / 2
            text: "Play"
            ltgType: "shortcut"
            ltgAction: "shortcut"
            ltgParameters: "Space"

            background: Rectangle {
                color: loopToGo.properties["isPlaying"] && loopToGo.properties["isPlaying"] ?
                    "orange" : "green"

                radius: width*.03  // To be identical to default in ltgButton.qml
            }
        }

        LtgButton {
            Layout.preferredWidth: mainItem.width / 3
            Layout.preferredHeight: mainItem.height / 2
            text: "Rewind All"
            ltgType: "shortcut"
            ltgAction: "shortcutByID"
            ltgParameters: "-1000"
        }
    }
}
With these steps, we’ve built a simple, functional interface that interacts with LoopToGo’s core features. QML is a powerful language, and fully mastering it is beyond the scope of this document. However, there is plenty of documentation and many tutorials available online, and most AI chat tools can also be helpful while coding. When doing your research, keep in mind that LoopToGo uses QML 6, as some examples might refer to other versions.
Calling script from an Interface
Calling a script from an interface, is very similar to executing a shorcut. It can be done using the ltgExecute function:
ltgExecute("loadScript", "scriptFilename.ltgs", "my arguments")Or more easily, by using a ltgButton:
LtgButton {
            Layout.preferredWidth: mainItem.width / 3
            Layout.preferredHeight: mainItem.height / 2
            text: "My Script"
            ltgType: "loadScript"
            ltgAction: "scriptFilename.ltgs"
            ltgParameters: "my arguments"
        }
Default Script Paths
Anyone interested in developing custom Interfaces must understand the default script path system. The script paths differ between factory Interfaces and user-defined custom Interfaces. The following table outlines the priority order of the script paths for both cases:
| Priority | Factory Interfaces | User Interface (My Interfaces) |
| 1 | absolute path | absolute path |
| 2 | path relative to QML file | path relative to QML file |
| 3 | {binary path where LoopToGo.exe is installed}/Scripts | {user documents}/LoopToGo/Scripts |
Additionally, when an Interface is copied from the factory examples, all the scripts it uses are also copied into a folder named after the Interface. This ensures that the copied Interface retains its original behavior, even if the corresponding Factory Interface is modified in a future release.
Many Factory Interfaces share the same scripts, but when copied, these scripts are duplicated in separate locations. This design prevents conflicts if a Factory script is updated later.
That said, if you’re developing your own Interfaces from scratch, it is good practice to reuse shared scripts and save them in {user documents}/LoopToGo/Scripts.
Final Thoughts
By leveraging both the Factory and custom interfaces, you can tailor LoopToGo to suit your workflow perfectly. The flexibility offered by QML, along with LoopToGo’s robust scripting and shortcut mechanisms, opens up a world of possibilities for personalization and enhanced functionality.
Feel free to experiment further, and remember that for in-depth details on scripts, system variables, or shortcut lists, refer to the LoopToGo help page and navigate to Files > Preferences > Shortcuts.